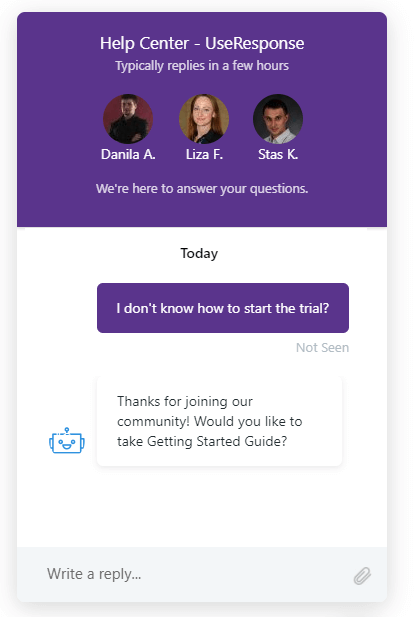
OnsiteSupport allows adding automation options to the Live chat solution that can help you with actions like greetings of your visitors, providing response when operators are not available or when it's required to set automated instructions.
All automation is based on Triggers in the system. Please refer to the article How Automation Triggers Work to better understand the automation process.

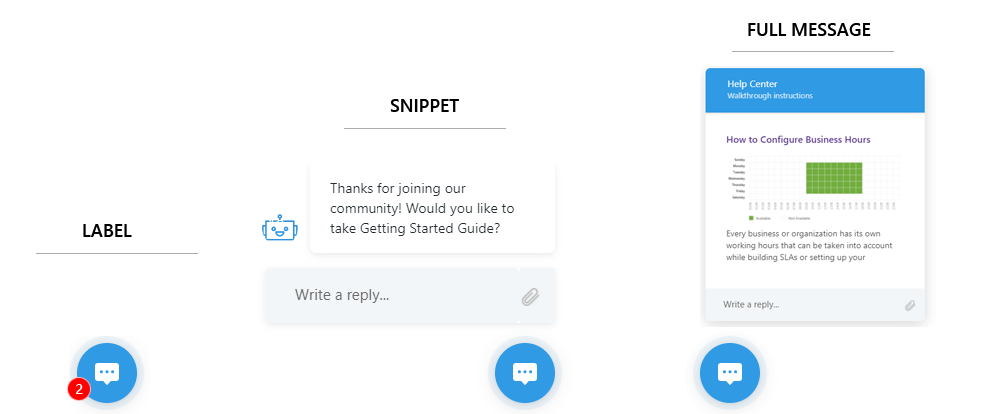
Your proactive support can display messages using Full Message Area, Snippet or Label that would define if you would like to show complete message or just make a short note on the page without distracting the user. Displaying messages like snippets or labels makes sense only in chat widget as messengers will send customers a usual link to the article or a regular message.
All automation process is based on 3 events that could be used in Administration » Automation & Notifications:
- Chat: Incoming Message
- Chat: User Activity
- Chat: On Click
Each of the events has a set of conditions and actions both for proactive support, sending targeted messages or agent assignments.
Incoming Message
With OnsiteSupport Incoming Message event you can define the rules for auto-replies to customer messages or set self-service system where customers get specific articles from Knowledge Base.
You can set multiple conditions based on which customers get self-service or be notified that you are not available: day, time, an incoming message with specific keywords, a user that submits the question, etc.

As a result, you would have either a targeted message to the customer that would say that your team is not available, or that you need some time to reply to the request. There could be a huge number of other use cases that you can build and use in your company according to your workflow.
User Activity
Handling incoming conversations with OnsiteSupport has lots of advantages but sometimes you want to reach customers automatically based on user behavior, initiate chat with a visitor and engage with him proactively.
There is the ability to start a conversation with a customer depending on his activity while navigating your website or application.
Use required conditions from the list provided to define rules when a user gets a message or is shown an article from Knowledge Base:
- Day & Time - when a user gets to your website;
- Number of Visits - a set minimum number of page clicks a user made;
- Page URL - where a user is located right now;
- Time on Page - a minimum number of seconds a user is located on the page;
- User (Team, Email) - identify which user is on the page. Use guest for anonymous users.

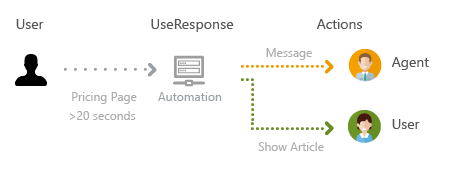
Let's explain how it works on the example. A visitor is staying on your pricing page for a long period of time, most likely he is confused about which plan or product to choose and needs expertise from the billing department in your company. There are two options: send him a targeted message after the user is located more than 20 seconds on the page or show him the article explaining your billing process in more detail. So you set Page URL and Time on Page conditions, and in actions either send a message or show the article from your Knowledge Base.
On Click
In some cases, it's useful to start a conversation automatically when the user clicks a specific element on your page. This way you can provide users kind of tutorial through your site based on his clicks, specific page user landed and other conditions.
Before setting up conditions and actions which are similar to previous events, you would need to add HTML Selector to identify the element, block, image or area user clicked on the page.
Repeat Actions
There is an additional option for chat events to repeat actions in the trigger every time when conditions are met. By default, the option is switched off. It means that the trigger will be launched only once per user.
Let's review the use cases that will show the benefits of the option.
For example, you defined the trigger according to which user should get auto-message with an article from Knowledge Base when he starts the conversation with some keywords. If the option "Repeat Actions" is enabled, the client will get the auto-message every time he uses specific keywords defined in the trigger during the conversation with your chat operator. To prevent such non-user-friendly behavior, you just need to switch off repeating trigger actions.
But in some cases repeating actions could be helpful. If you want to attract customer's attention automatically with labels or snippets based on their activity, chat messages will be displayed every time if the user spends a required period of time on a specific page or clicks some elements on the site.
If the user started a conversation in chat, trigger with Chat: User Activity event will not work even if the option to repeat actions is enabled
Using Multiple Profiles
Create several live chat widget profiles in order to define which one would be used for displaying articles and which would show targeted messages. Different profiles could be used in different areas of your application and have separate behavior and UI.


