
After reviewing the Mailing Log, if you see "ERROR : You’ve reached the limit of emails!", this typically means that your daily limit for sending emails has been reached.
Why is there a limit?
While your subscription doesn't have a limit on sending/receiving emails, if you're using Onsite's SMTP (Simple Mail Transfer Protocol), there's an email sending limit of 800/day per license. This limit has been setup to combat emails being marked as Spam.
Can I resolve this using Onsite's SMTP?
Please allow 24-hours for the limit to reset automatically or you can reach out to support@onsitesupport.io - Our Support team can assist you with eliminating duplicate outbound emails sent via Automation & Notifications.
You may be eligible for a limit increase as well so please Contact Us
How can I check if I'm using Onsite's SMTP?
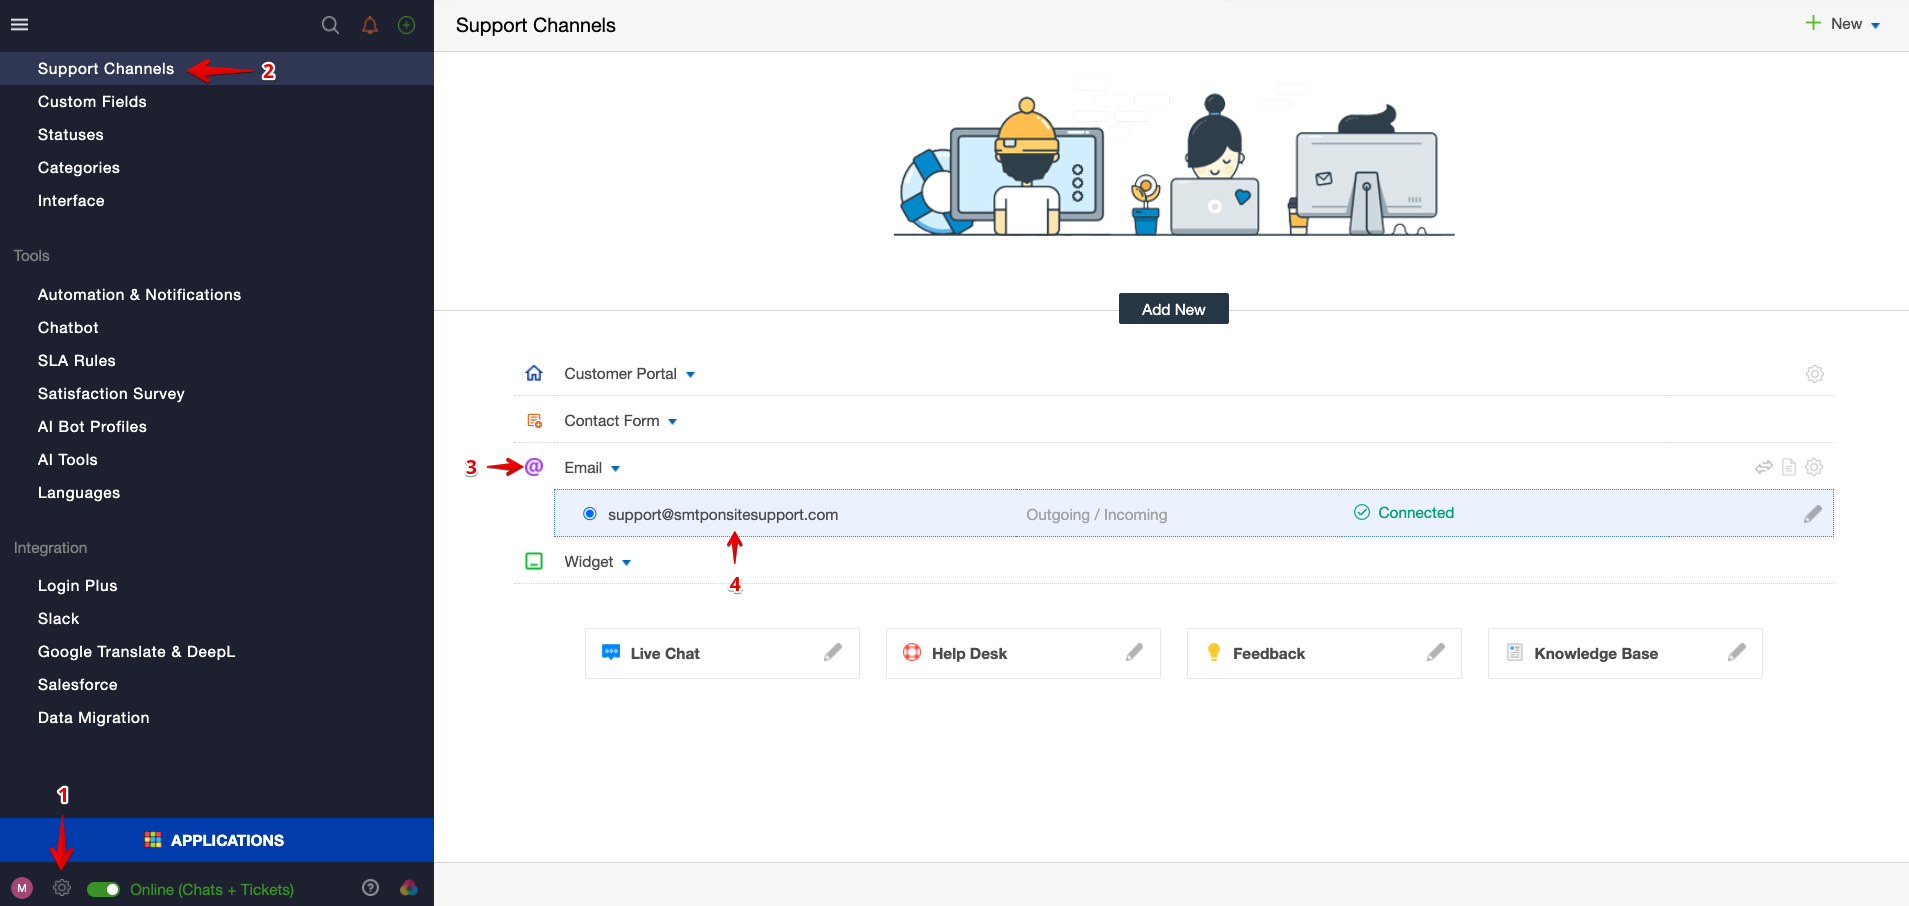
You can check this within Onsite. To access these settings, please follow the steps below:
- Click on Administration (Setting Gear Icon)
- Click on Support Channels
- Click on Emails
- The email has "SMTP" which confirms we're currently using Onsite's Default SMTP.
How can I bypass this limit?
The limit can be bypassed if you add your email address as an SMTP instead of using Onsite's SMTP. You can add either a Google Setup (Google Account) or Custom Setup (Other Accounts: Outlook, etc.)
Gmail SMTP Authentication Set Up
Once you've checked your Email Provider and is Gmail, feel free to connect your Email Address as it would allow you to receive / send emails without a limitation.
If the email you're adding has already been added as an Additional Mailbox within Onsite, be sure to Remove the Email Address first before following the steps below:
- Click on Pencil Icon for Onsite's SMTP Email

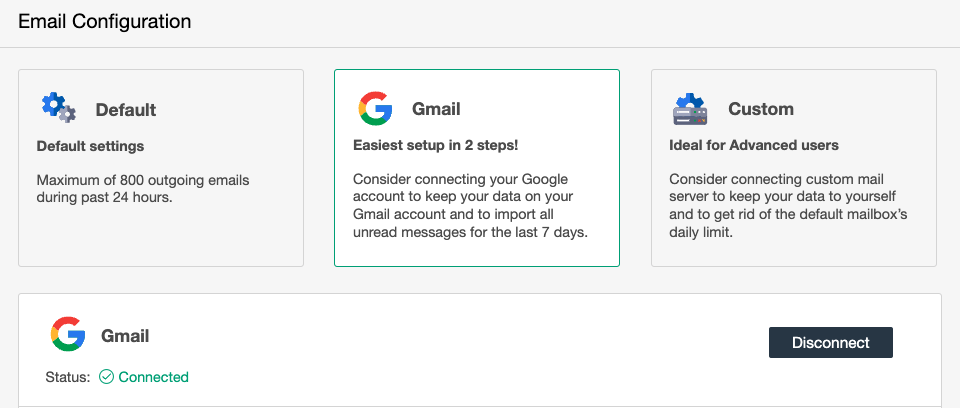
Once here, follow the steps below for Gmail SMTP Setup:
- Click on Gmail
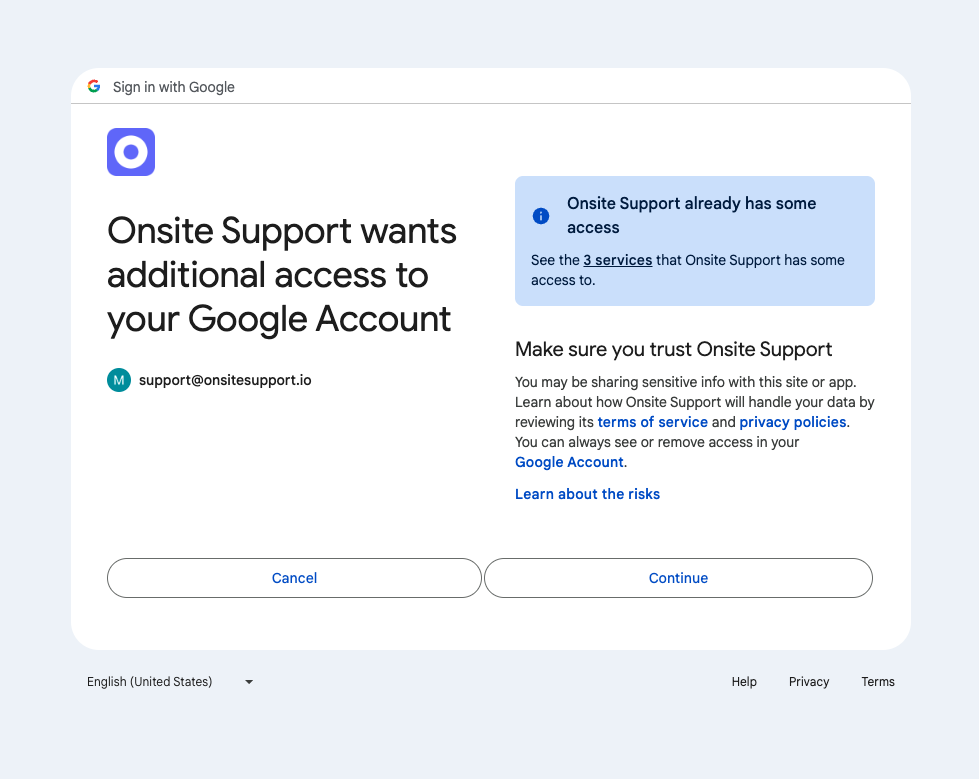
- Click on Sign in with Google

- Sign in to your Email Address

- You'll see an access Pop-Up via Google. Click on Continue.
You should now see the Gmail Status as Connected, which shows your email set up is successful.
Congratulations! Your support email address is now connected with Onsite and you should be receiving all of your emails within Onsite without limitations.
Custom SMTP Authentication Set Up
Once you've checked your Email Provider and is it either Outlook, Zoho, Yahoo etc, feel free to connect your Email Address as it would allow you to receive / send emails without a limitation.
If the email you're adding has already been added as an Additional Mailbox within Onsite, be sure to Remove the Email Address first before following the steps below:
- Click on Pencil Icon for Onsite's SMTP Email
Once here, follow the steps below for Custom SMTP Setup:
- Click on Custom
- Fill out the below:
-Email: Please enter the support email address you wish to include.
-Name: What customers see as email name
-Customer Portal: This community will be set by default to all incoming tickets. - Click on Continue

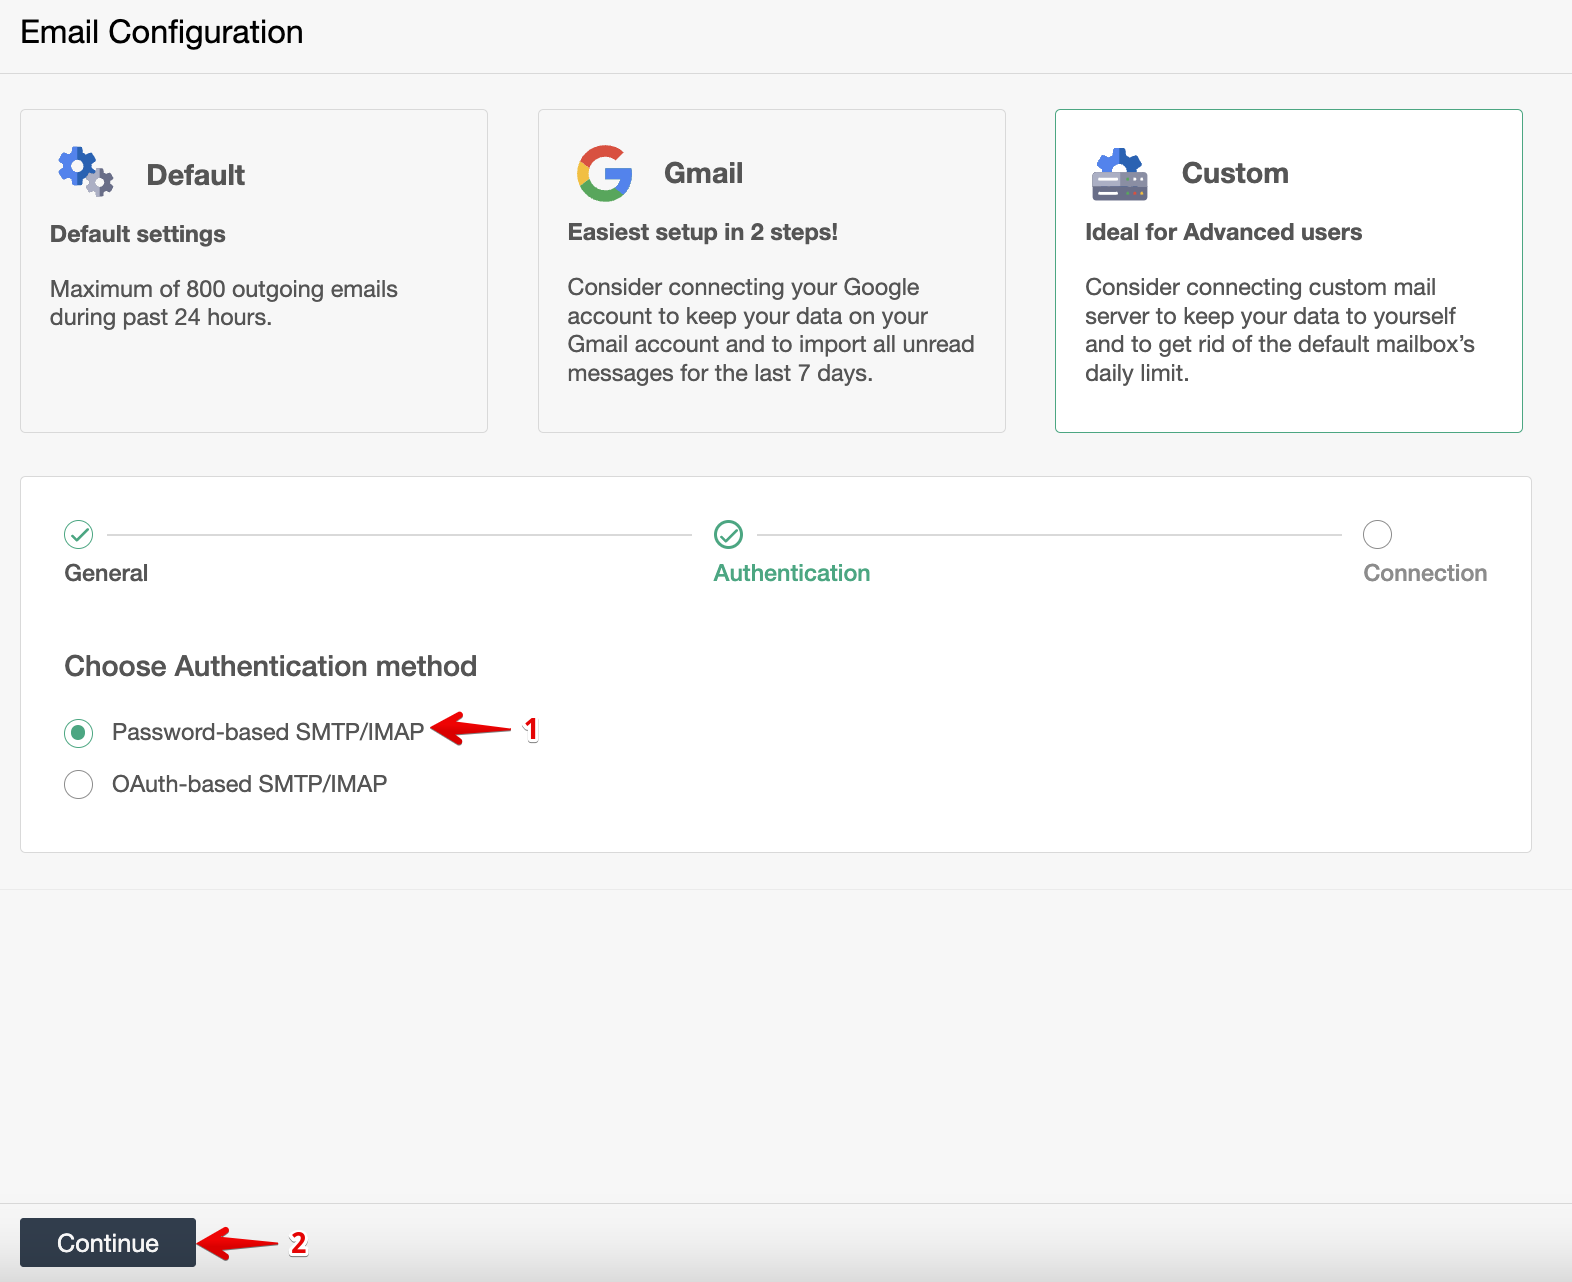
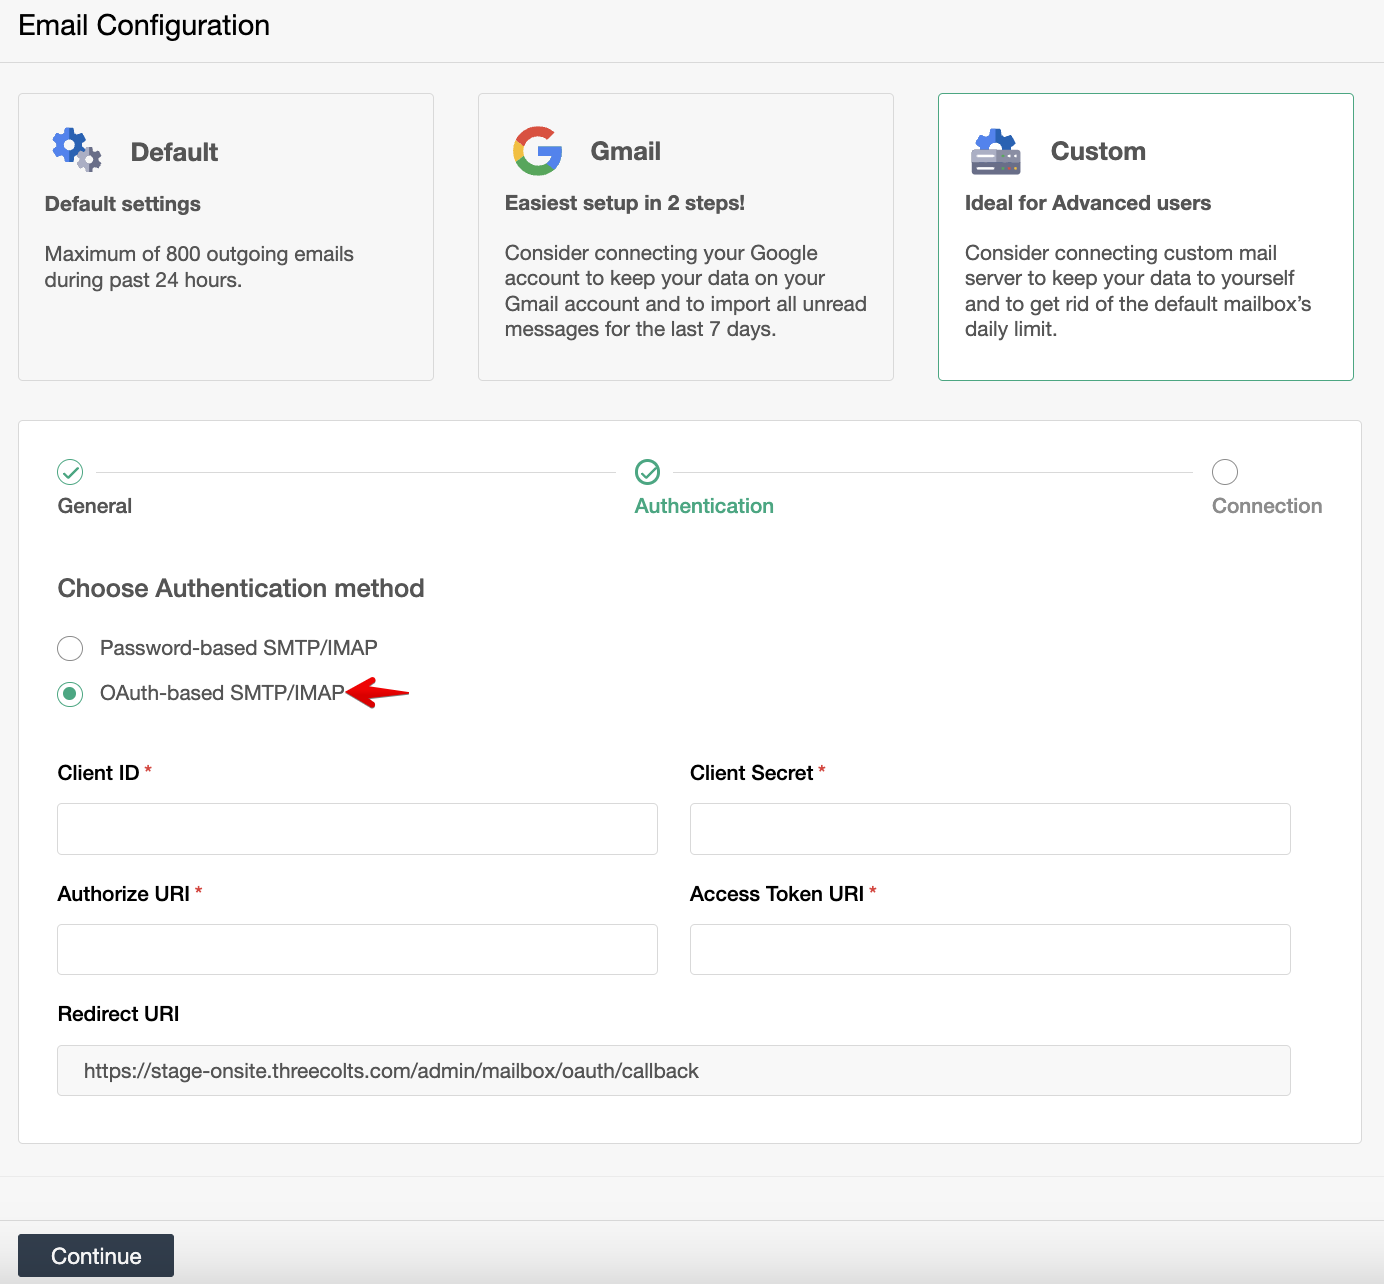
Next, you will chose Choose Authentication method. You will select either one of these.
- Password-based SMTP/IMAP
- OAuth-based SMTP/IMAP
In this context:
SMTP: It's used for sending emails. When configuring an email client or service to send emails (like Outlook, Gmail, etc.), you typically authenticate using a password to prove you have permission to send emails from that account.
IMAP: It's used for accessing emails stored on a server. When setting up an email client to receive emails (like accessing your inbox), you authenticate using a password to prove you have permission to view and manage those emails.
Password-based SMTP/IMAP
Password-based SMTP/IMAP refers to using a password as the authentication method for accessing SMTP or IMAP services. You may proceed with the setup via:
- Select Password-based SMTP/IMAP
- Click Continue
Fill out Connect SMTP and Connect IMAP
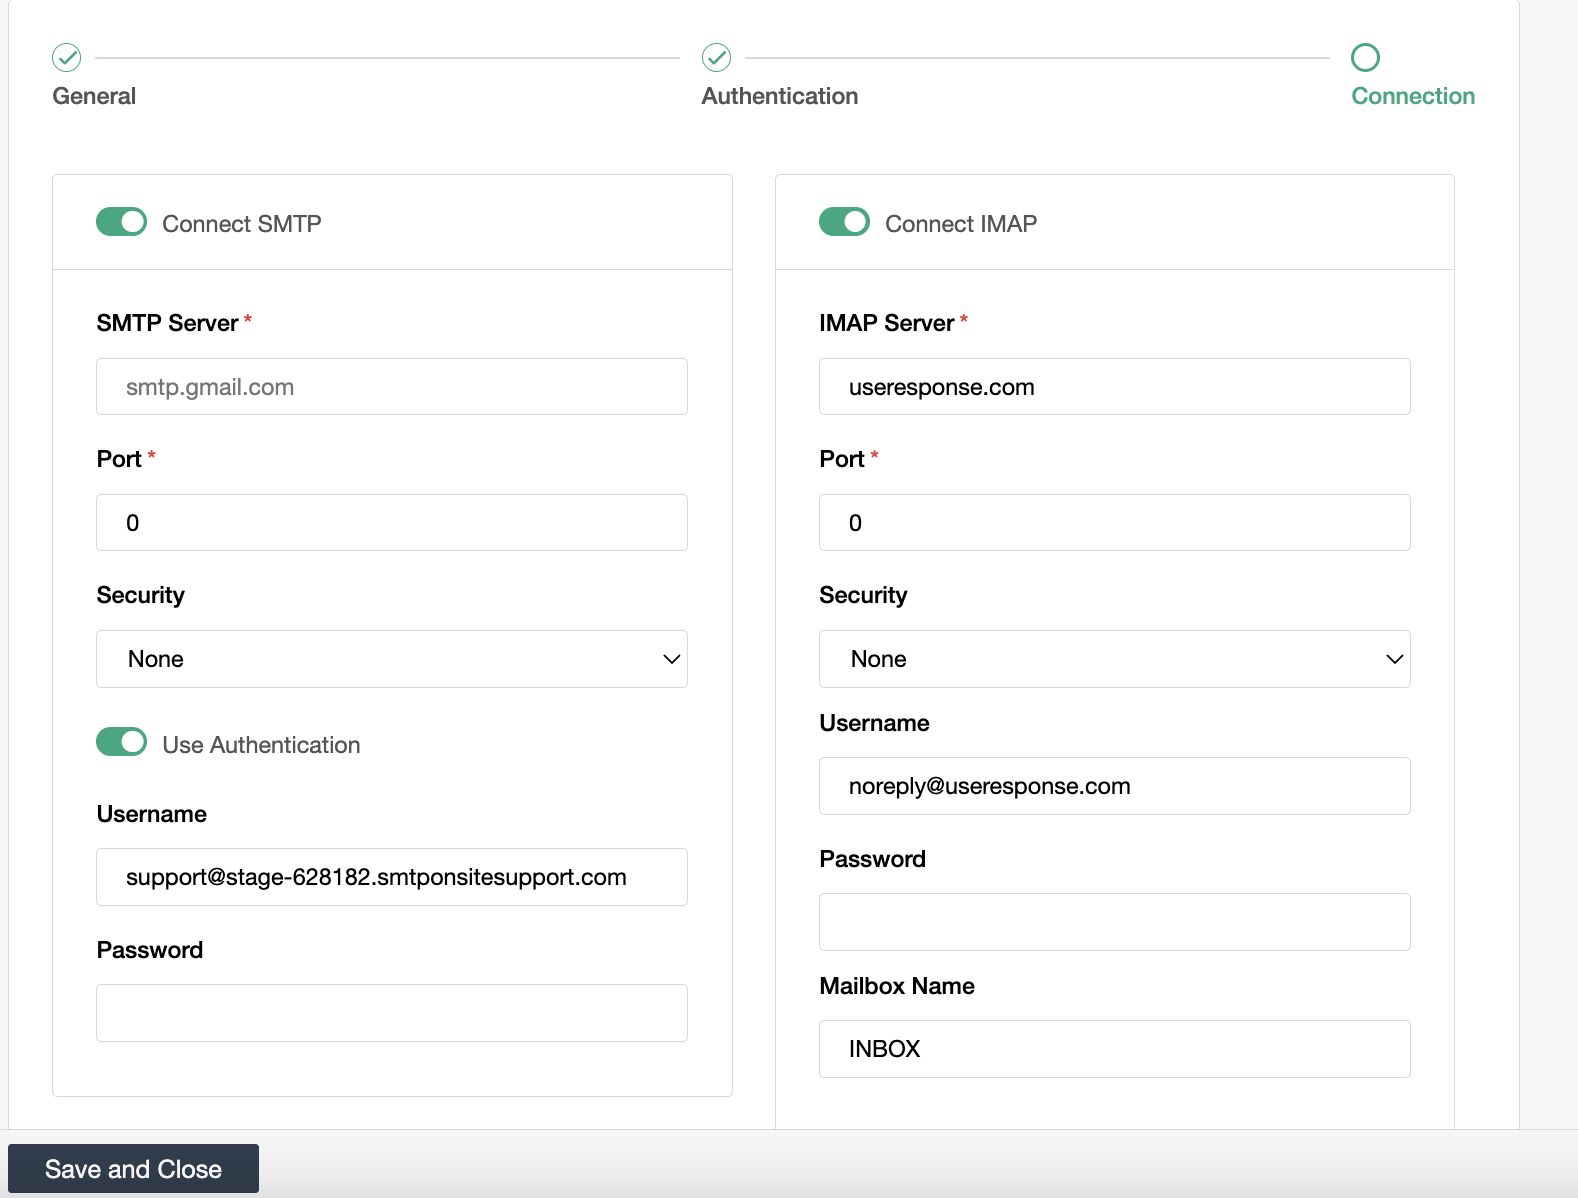
Click on Save and Close.
OAuth-based SMTP/IMAP (Outlook)
OAuth-based SMTP/IMAP refers to using the OAuth (Open Authorization) protocol as the authentication method for accessing SMTP or IMAP services.
Select OAuth-based SMTP/IMAP to proceed with the steps below:
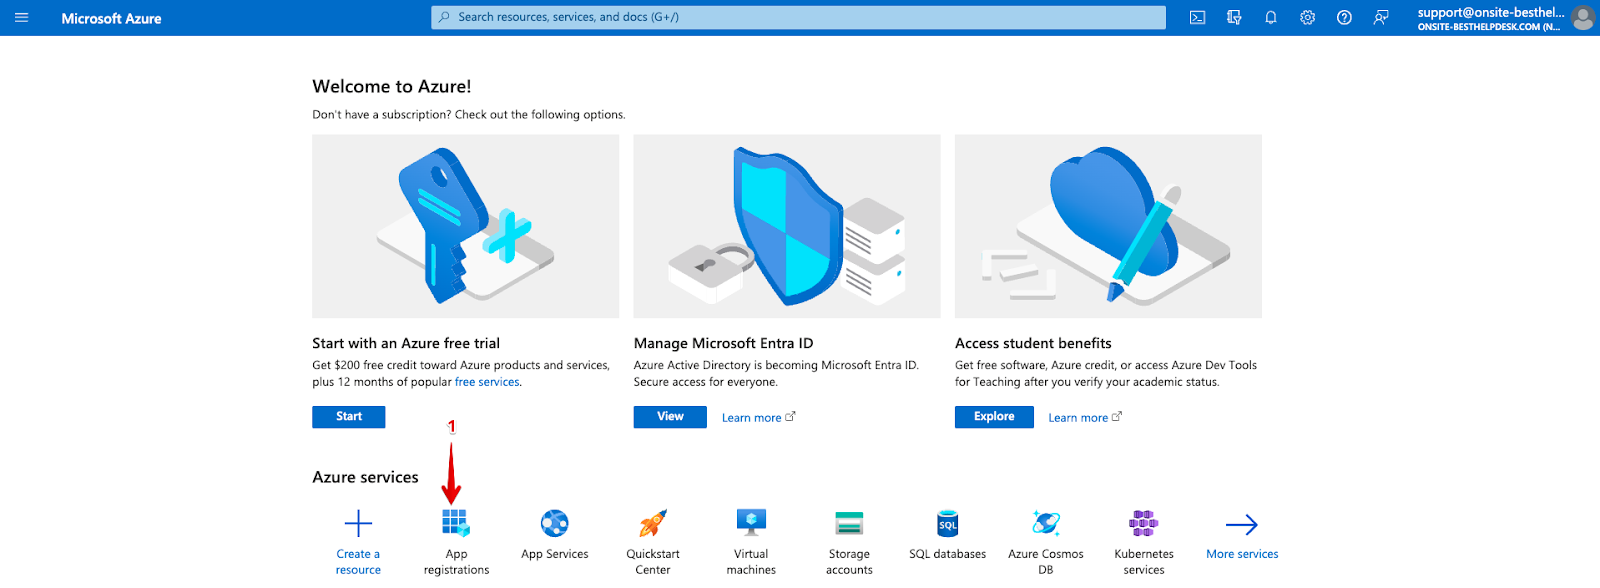
Please login via Microsoft Azure to proceed with the configuration and setup via the steps below:
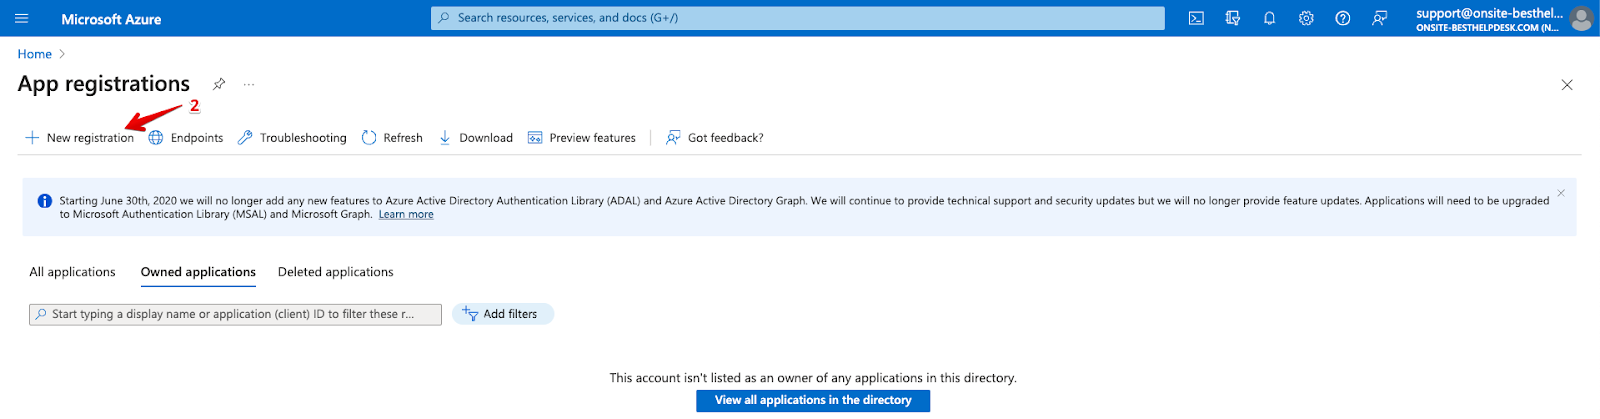
- Click on App Registrations (If you don’t see this, please find using search field)
- Once the page loads, click on New Registration
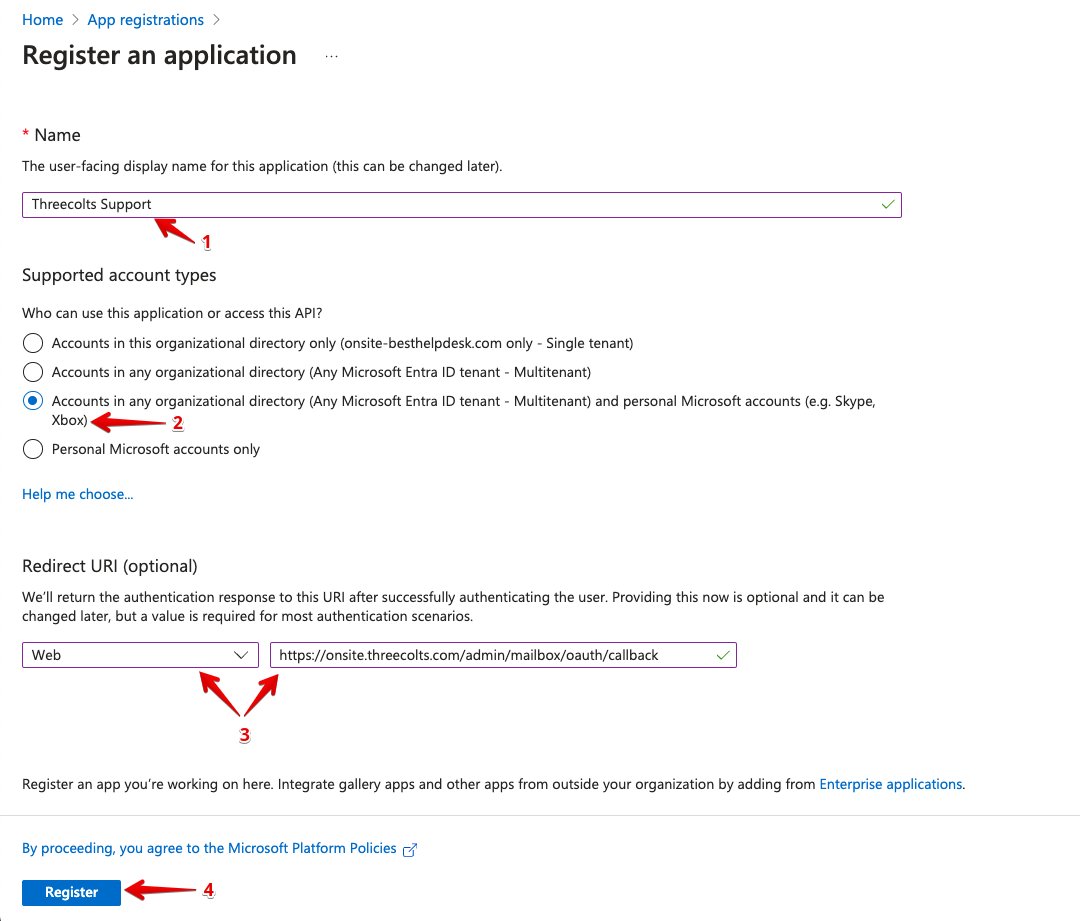
Fill out the below details to Register an application
- Enter Your Business Name or Onsite Support OAuth Outlook SMTP/IMAP
- Select the option Supported account types as Accounts in any organizational directory (Any Microsoft Entra ID tenant - Multitenant) and personal Microsoft accounts (e.g. Skype, Xbox)
- Within the Redirect URI, Select Web and paste the link: https://onsite.threecolts.com/admin/mailbox/oauth/callback
- Click on Register
Upon clicking on Register, you should see a pop-up screen showing Registration Successful, allowing you to proceed with the Authentication process.
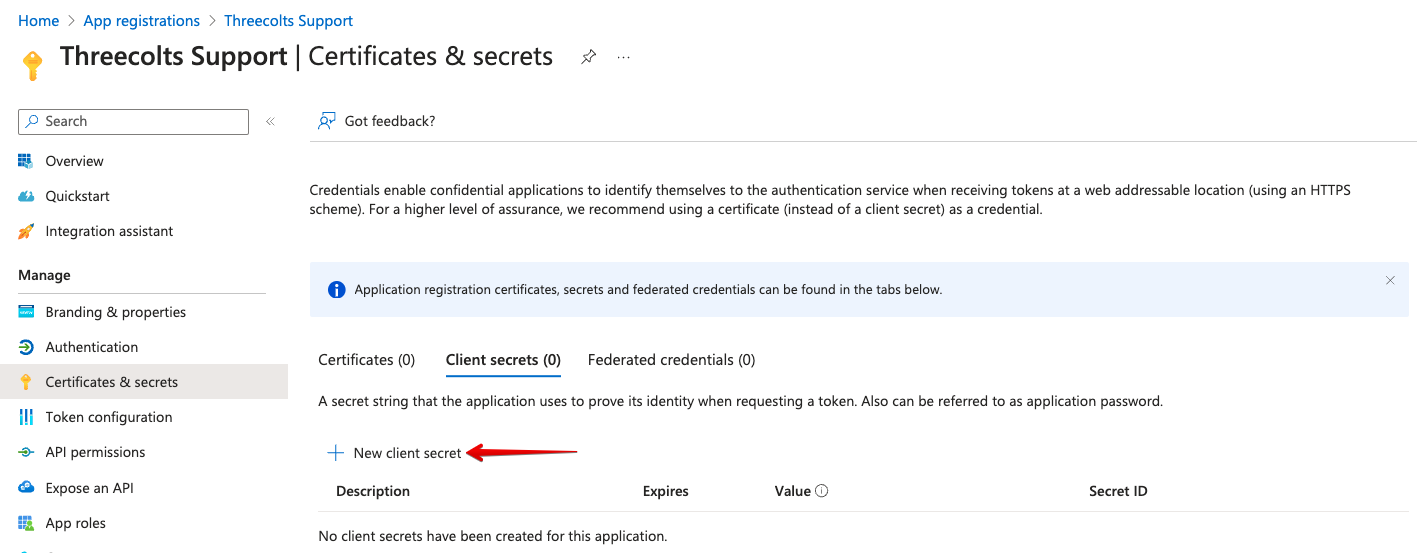
You should be able to see the newly registered App to proceed with the email setup. Please follow the steps below to proceed with the Authentication:
- For Client credentials > Click on Add a certificate or secret
- Click on New Client Secret
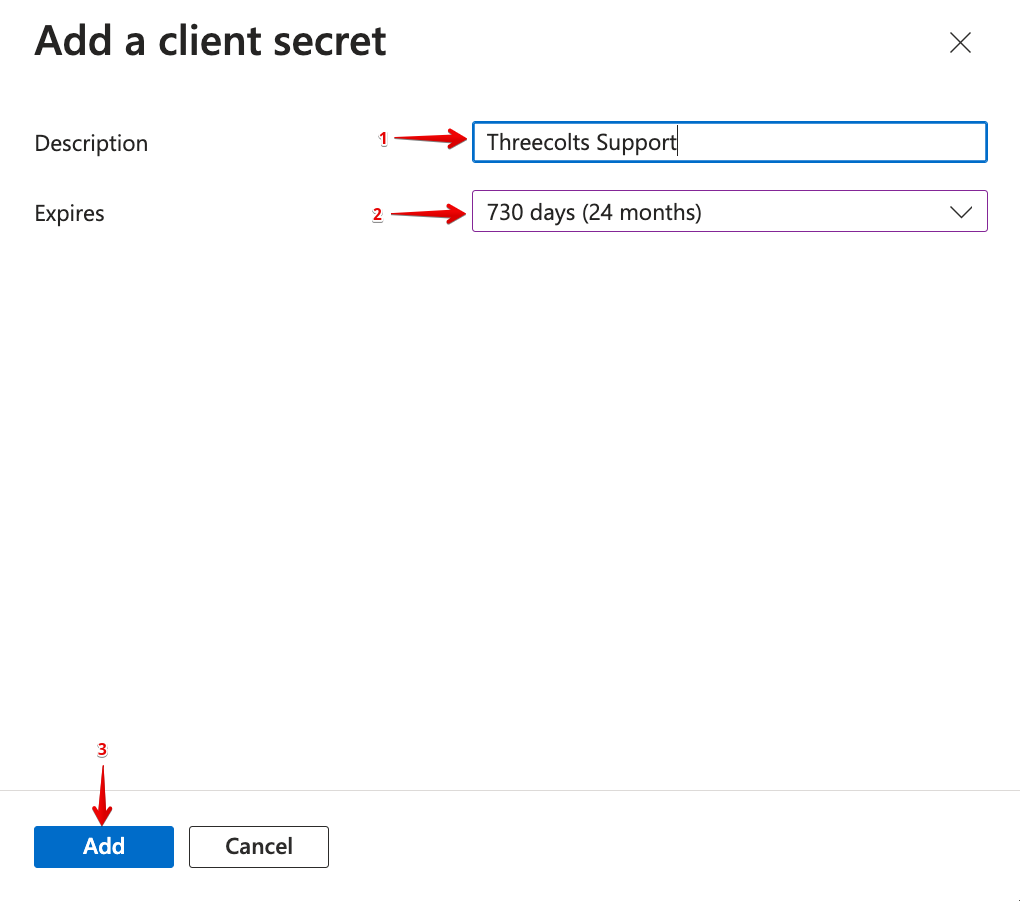
- Add a Client Secret via the following steps:

- For Description: Enter a Name (Brand/Company)
- For Expires: Select 730 days (24 months)
- Click on Add
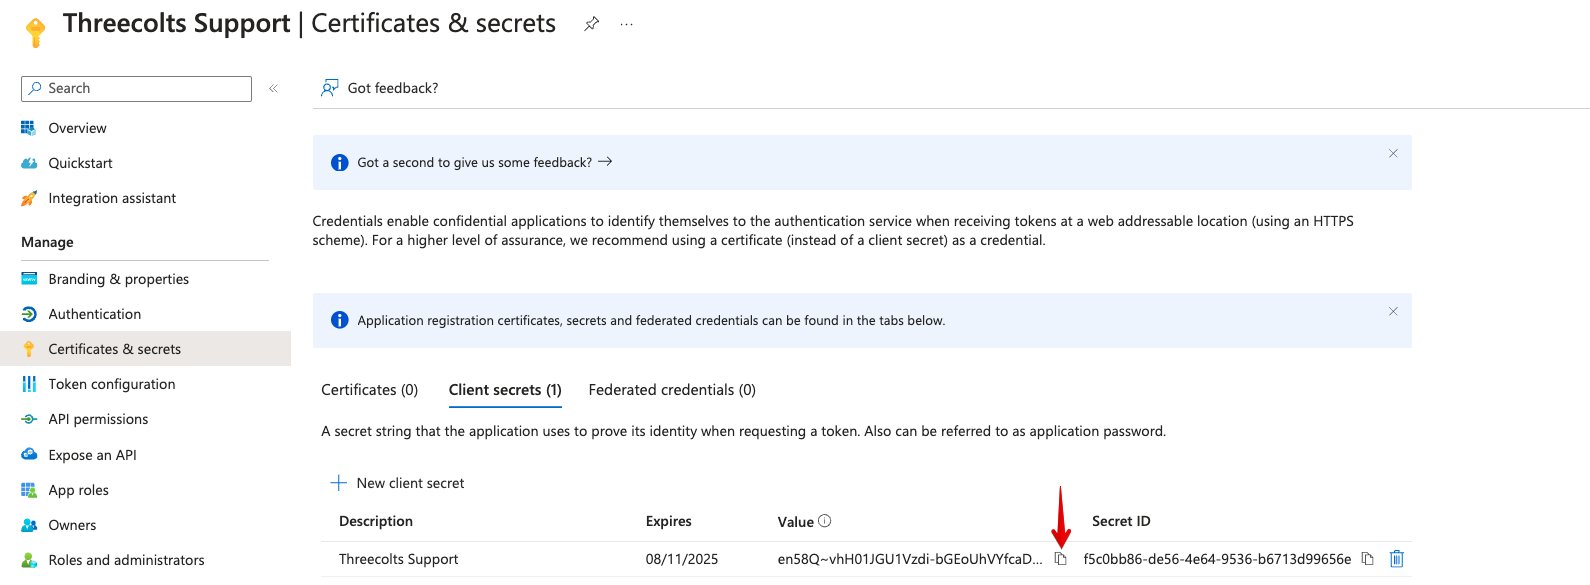
Once completed, you should see a pop-up showing Application Updated Successfully. Copy the Value field as save for now, as it will be required for configuration within Onsite Support.
4. Please click on Overview > Copy Application (client) ID.
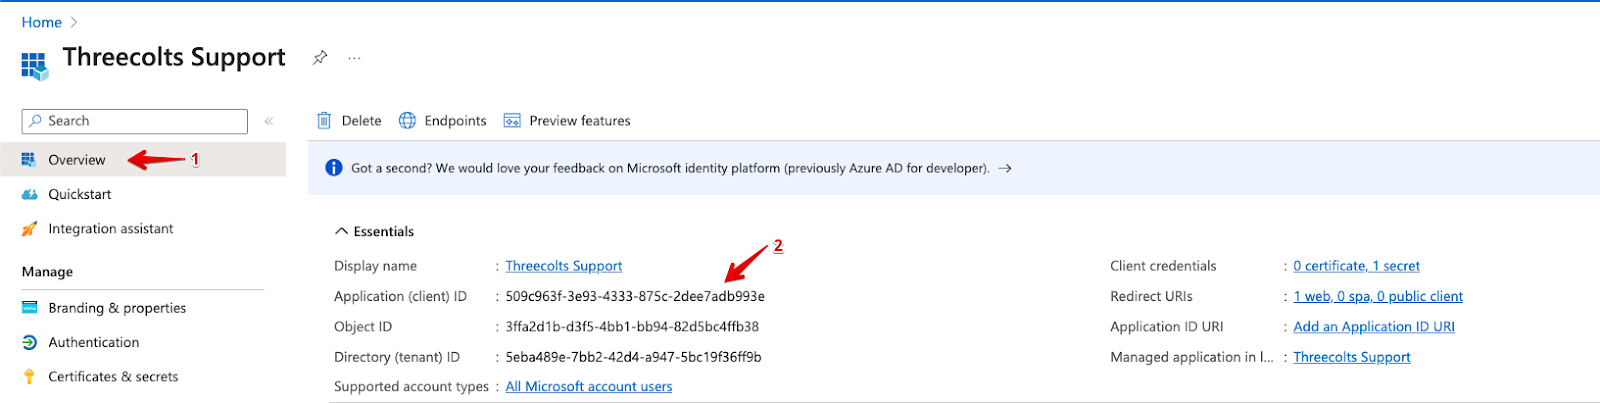
We’ll now be inputting the details within Onsite for your Email Setup so please access your Onsite Account and follow the steps below:
- For Client ID: We previously copied the Application (client) ID from Azure, paste it here.
- For Client Secret: We previously copied Value from Azure, paste it here.
- For Authorize URI: Paste the link https://login.microsoftonline.com/EDIT-THIS/oauth2/v2.0/authorize
- For Access Token URI: Paste the link https://login.microsoftonline.com/EDIT-THIS/oauth2/token
Please Access Microsoft Azure again and copy the Directory (tenant) ID and replace the EDIT-THIS fields within Authorize URI and Access Token URI links.
It should look like the below screenshot:
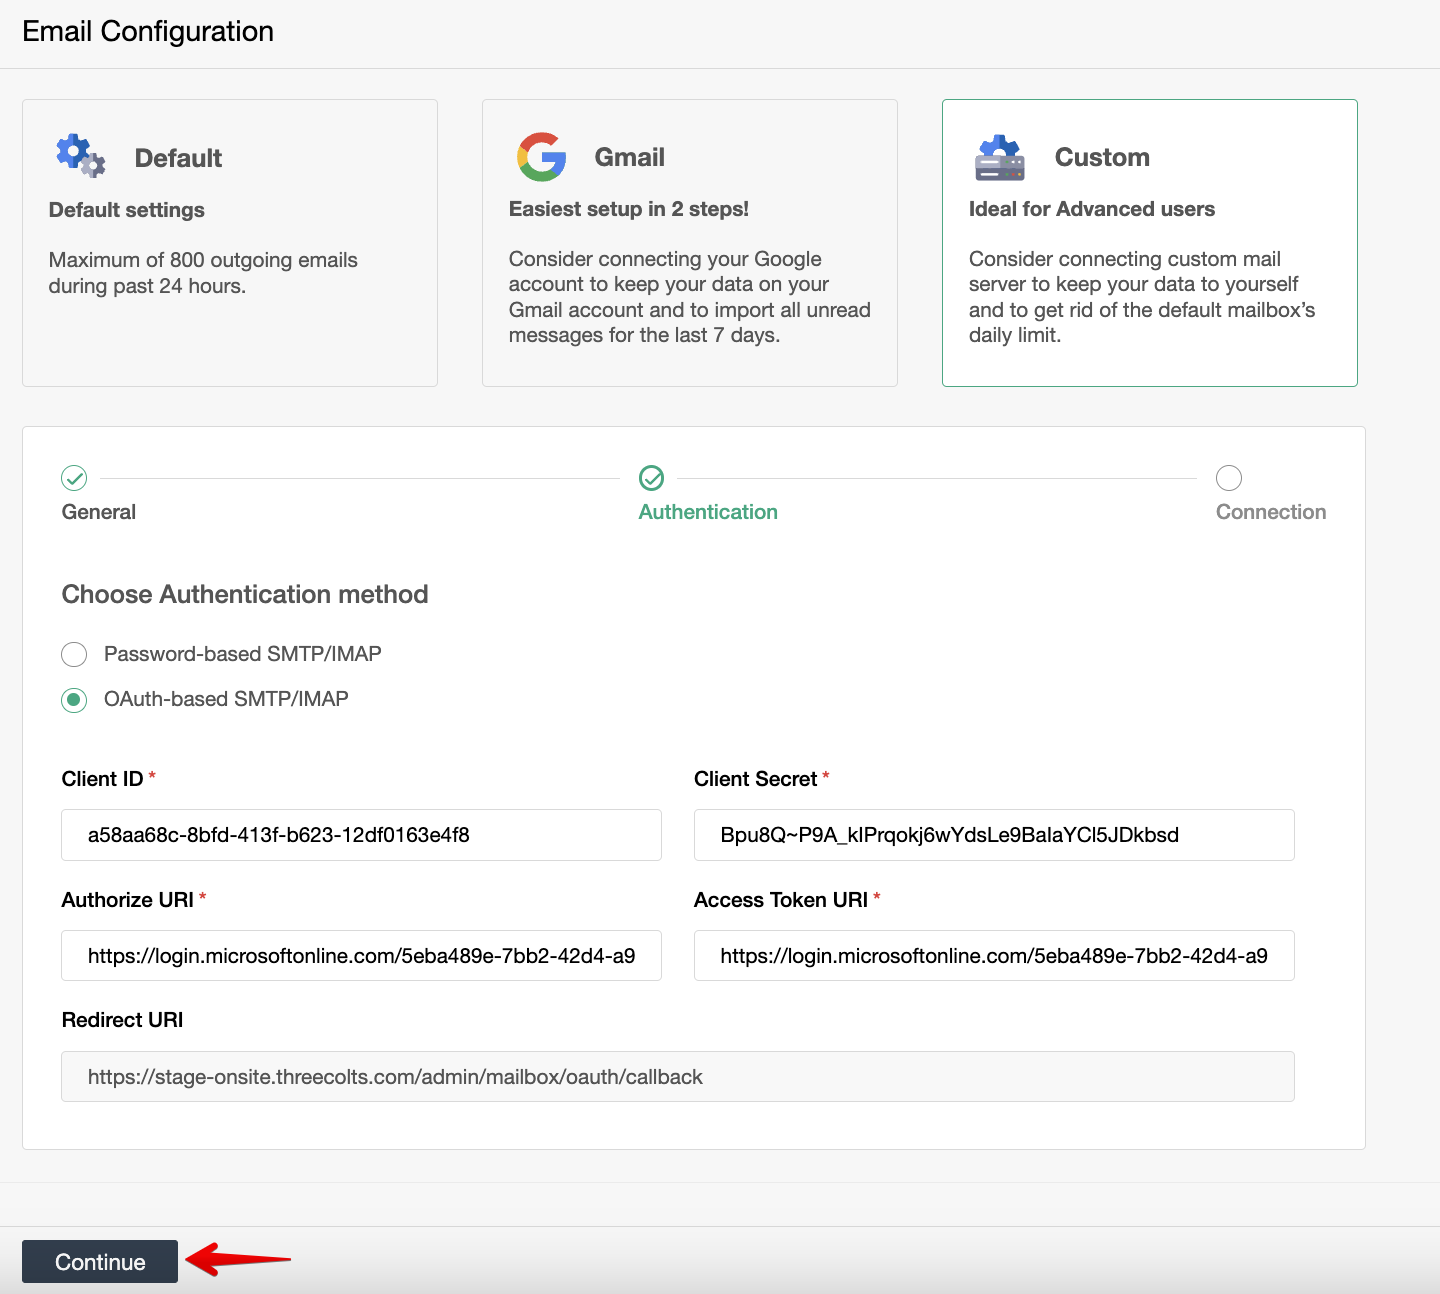
Click on Continue.
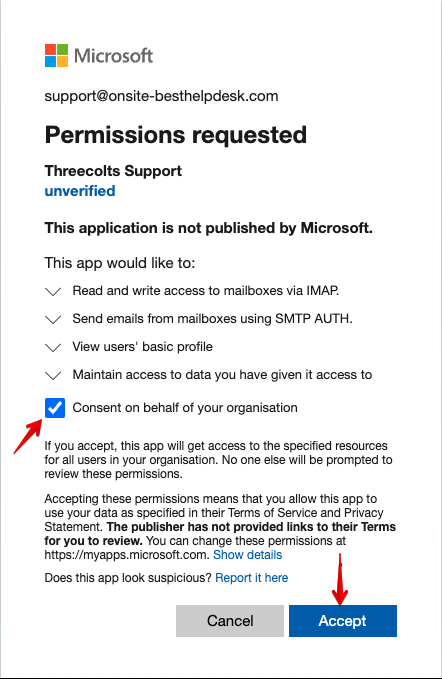
You’ll see a pop-up showing Permissions requested, please Enable > Click on Accept
Once done, it should proceed with the Custom Connection.
- Enable Connect SMTP
- Enable Connect IMAP
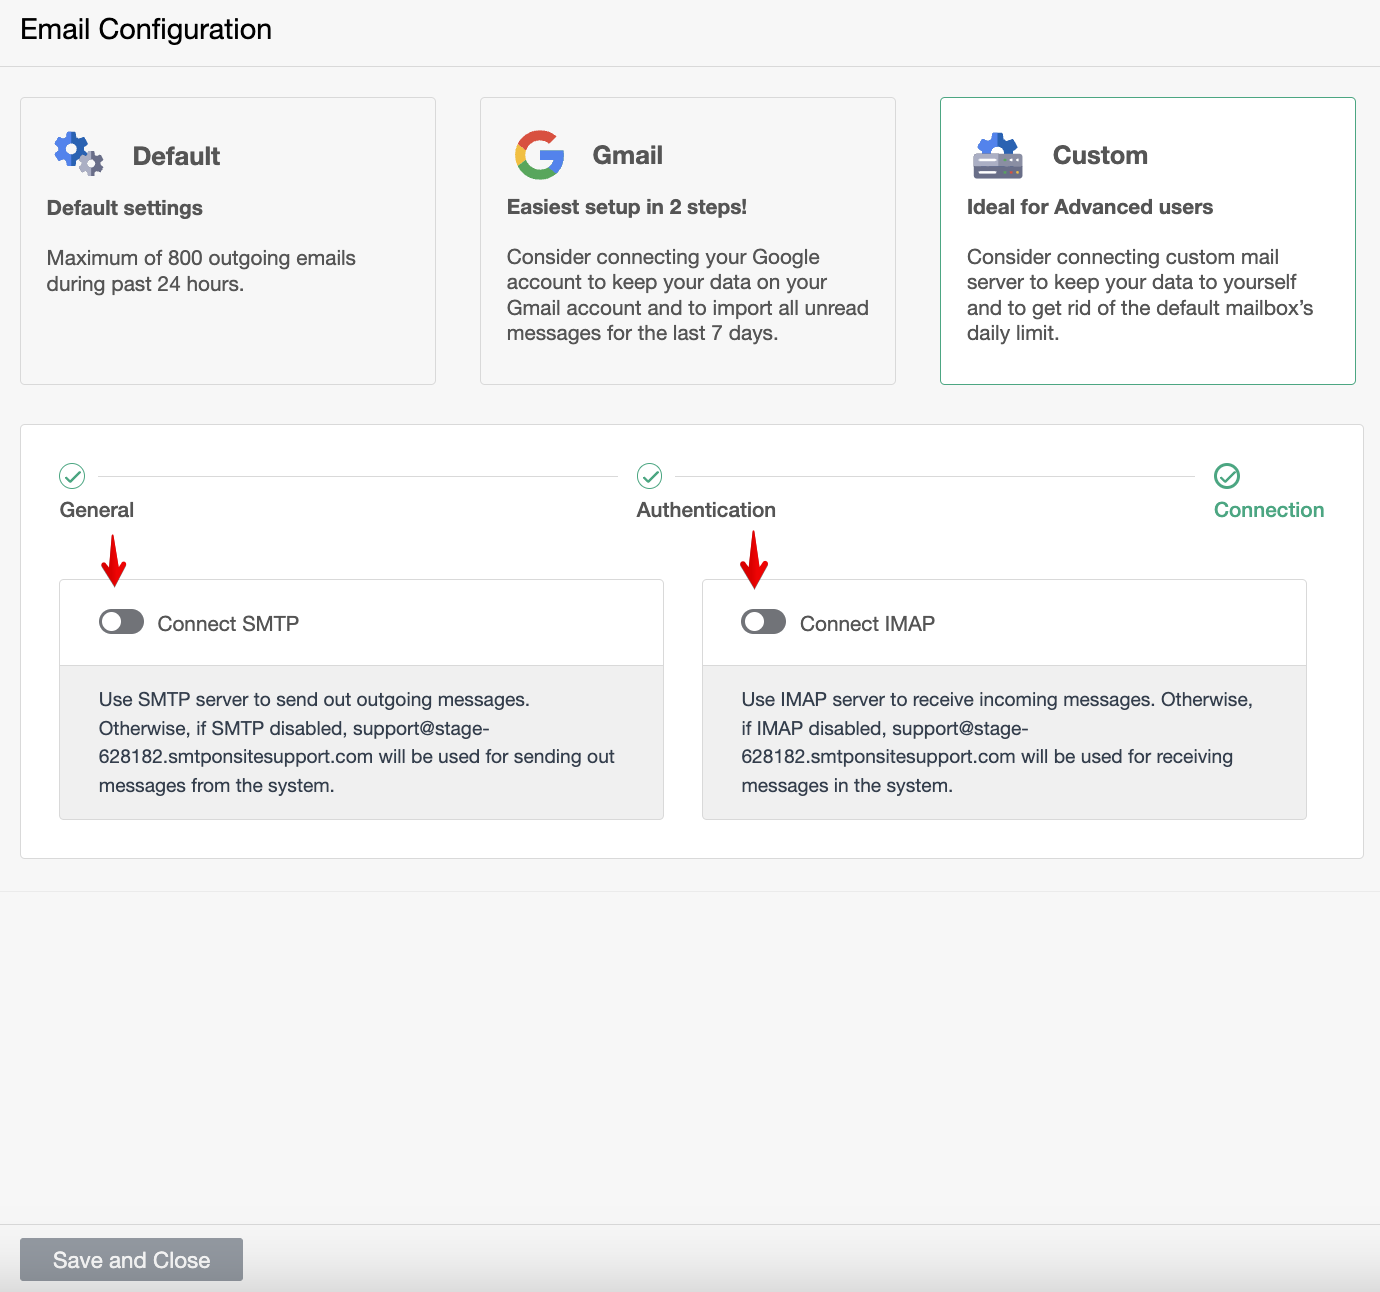
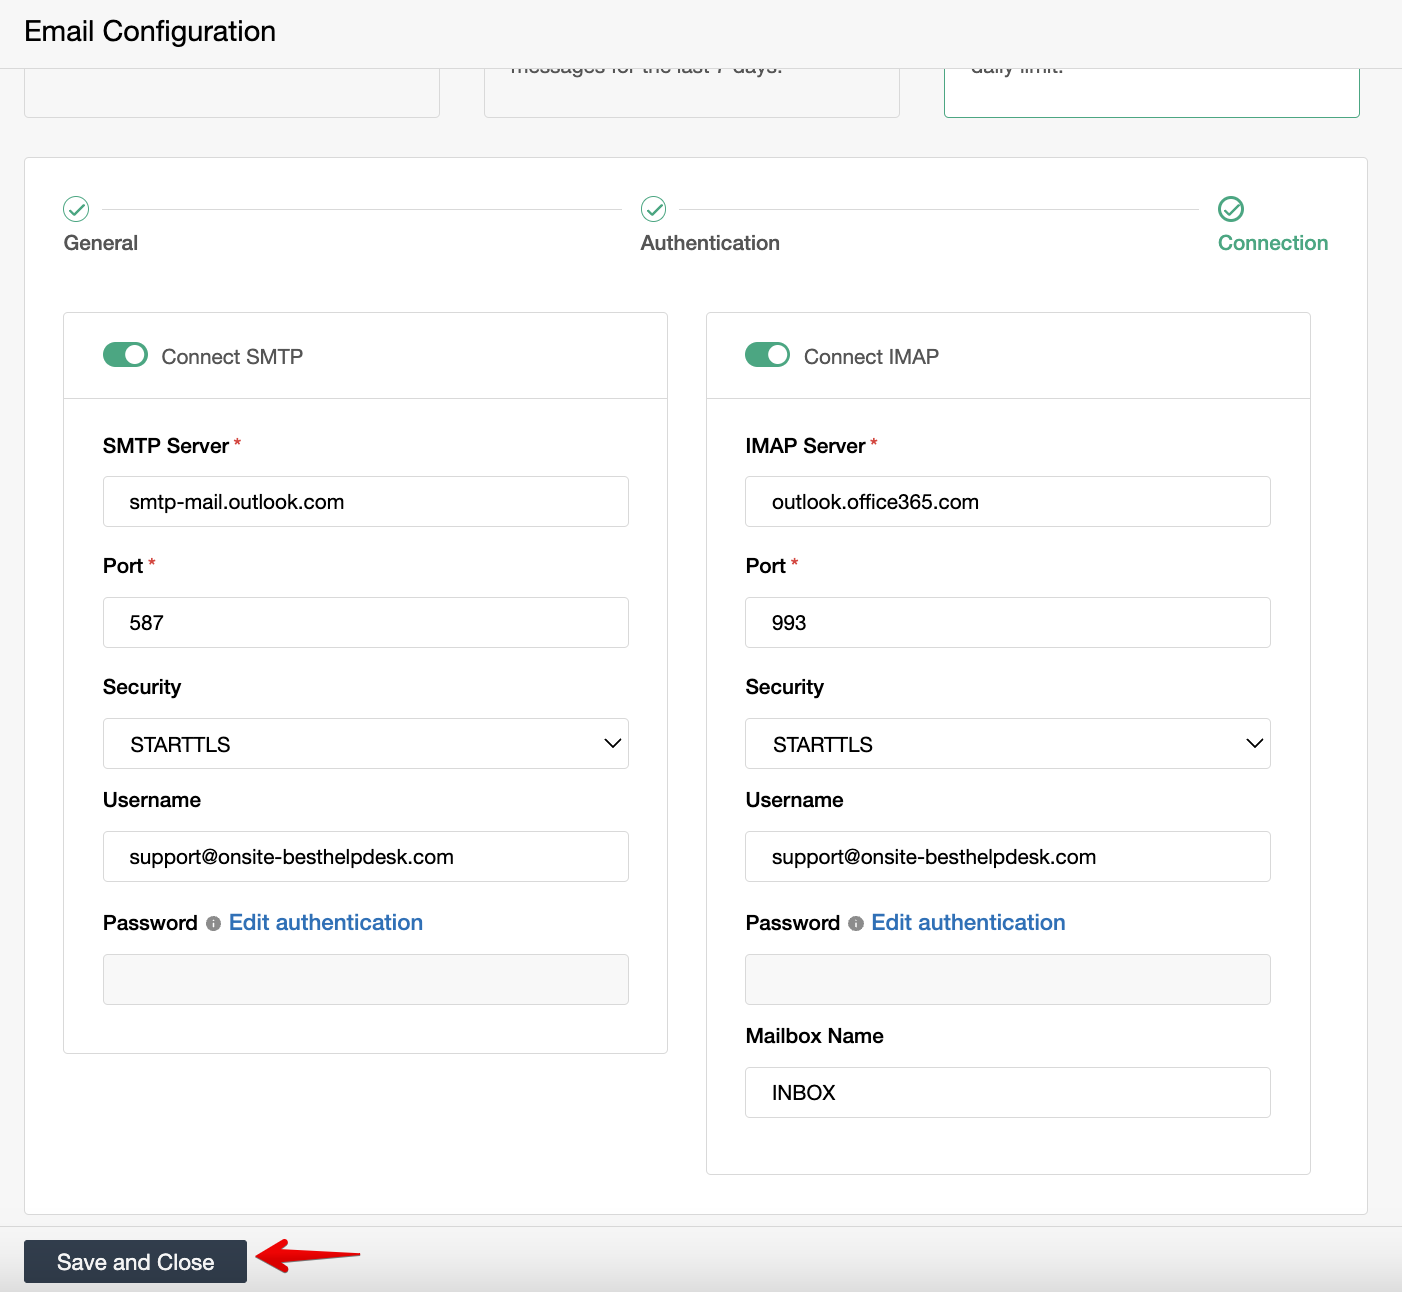
Once enabled, please follow the steps below to Setup the SMTP
- SMTP Server: Enter smtp-mail.outlook.com
- Port: Enter 587
- Security: Select STARTTLS
- Username: Please enter your Email Address
Next, please follow the steps below to Setup the IMAP
- IMAP Server: Enter outlook.office365.com
- Port: Enter 993
- Security: Select STARTTLS
- Username: Please enter your Email Address
Click Save and Close.
Congratulations! Your support email address is now connected with Onsite and you should be receiving all of your emails within Onsite without limitations.