ChannelReply makes it a cinch to set up an Amazon integration with Onsite. Start by connecting your Onsite Support account. Then follow the instructions below. You’ll be answering Amazon messages from Onsite in no time—without logging in to Seller Central!
1. Get Ready
To connect an Amazon account, you will need to sign in as the Amazon account owner. Just having admin permissions is not enough.
If you are not the account owner, make sure you have the owner’s username and password before getting started. You will also need a way to get the two-factor authentication code that will most likely be sent to the owner’s cellphone.
If You Already Have a ChannelReply Account
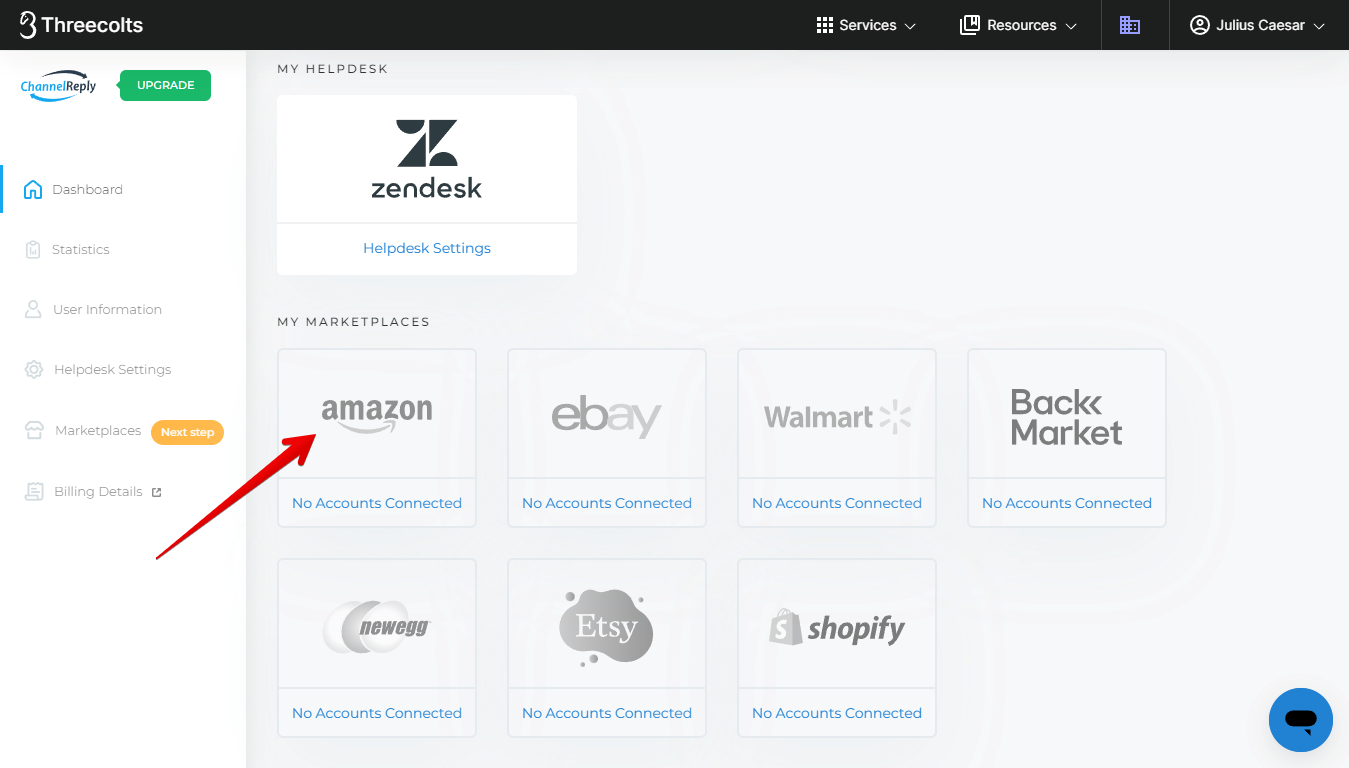
When you’re ready, sign in to ChannelReply. Click “Amazon” on your ChannelReply dashboard…
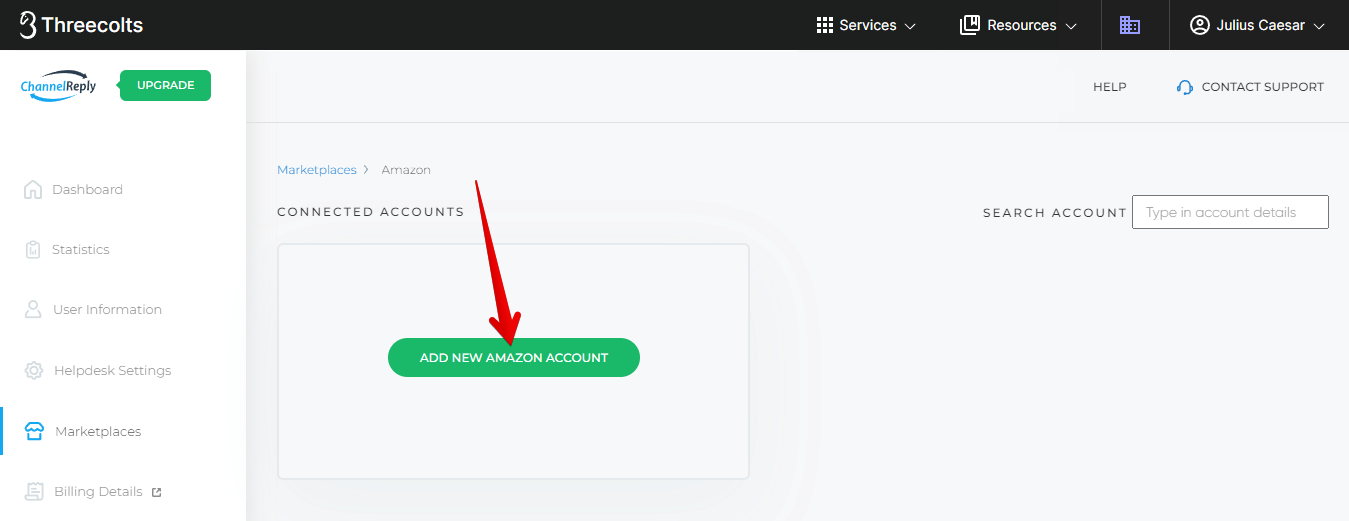
…then “ADD NEW AMAZON ACCOUNT.”
If You Haven’t Created an Account Yet
Start your free 14-day trial here.
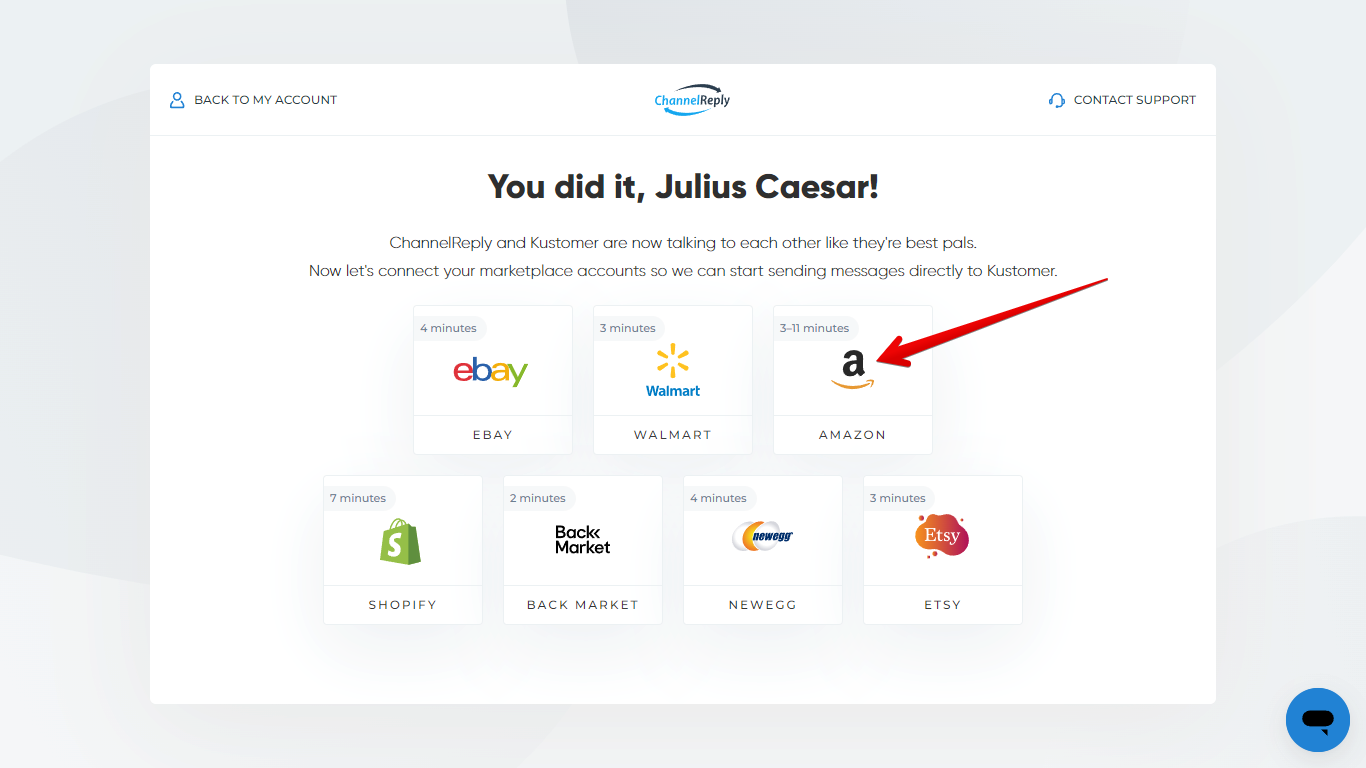
As soon as you’re finished, you’ll see a screen like the one below. Click “Amazon” to begin.
2. Choose Your Region & Marketplaces
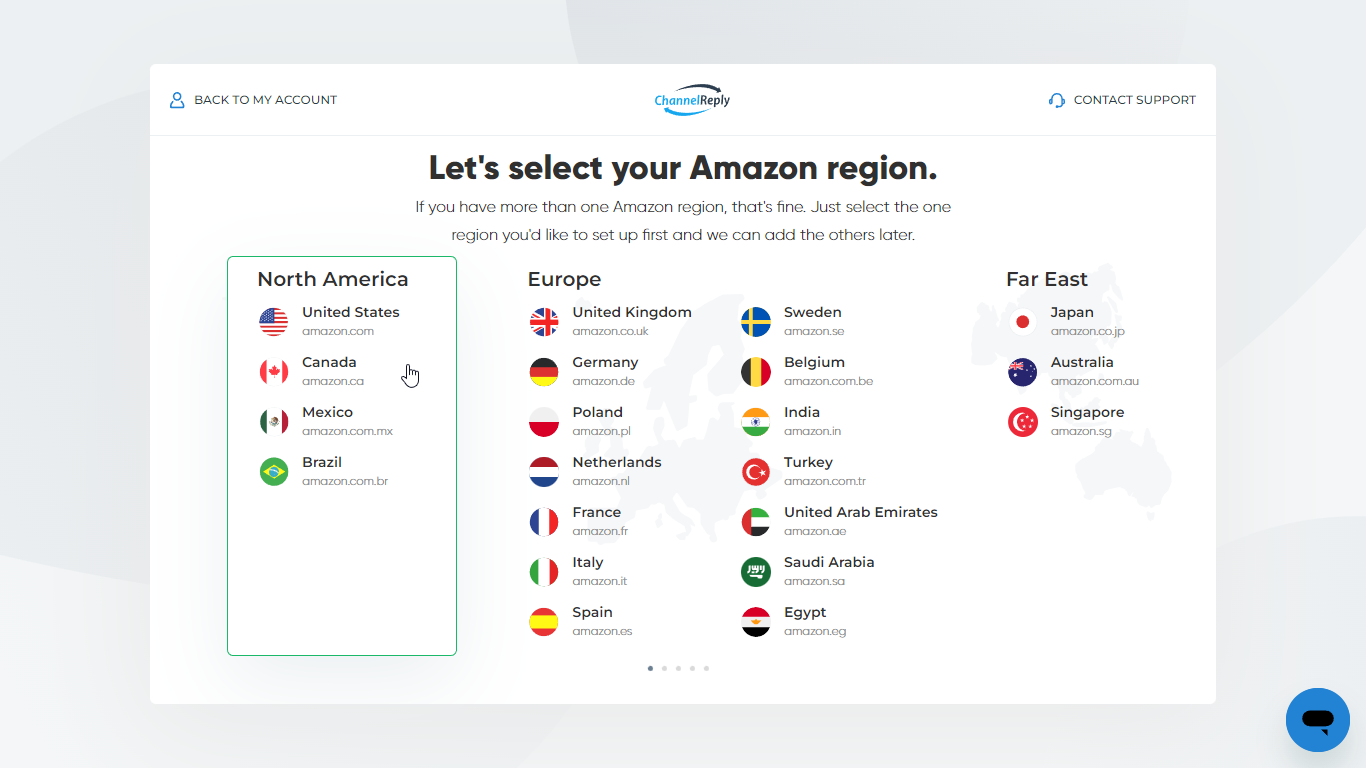
You will arrive at a screen asking you to choose an Amazon region: North America, Europe, or Far East. Choose any one of the regions where you currently sell, such as North America if you sell on amazon.com. You’ll be able to connect as many other accounts, regions and marketplaces as you want later.
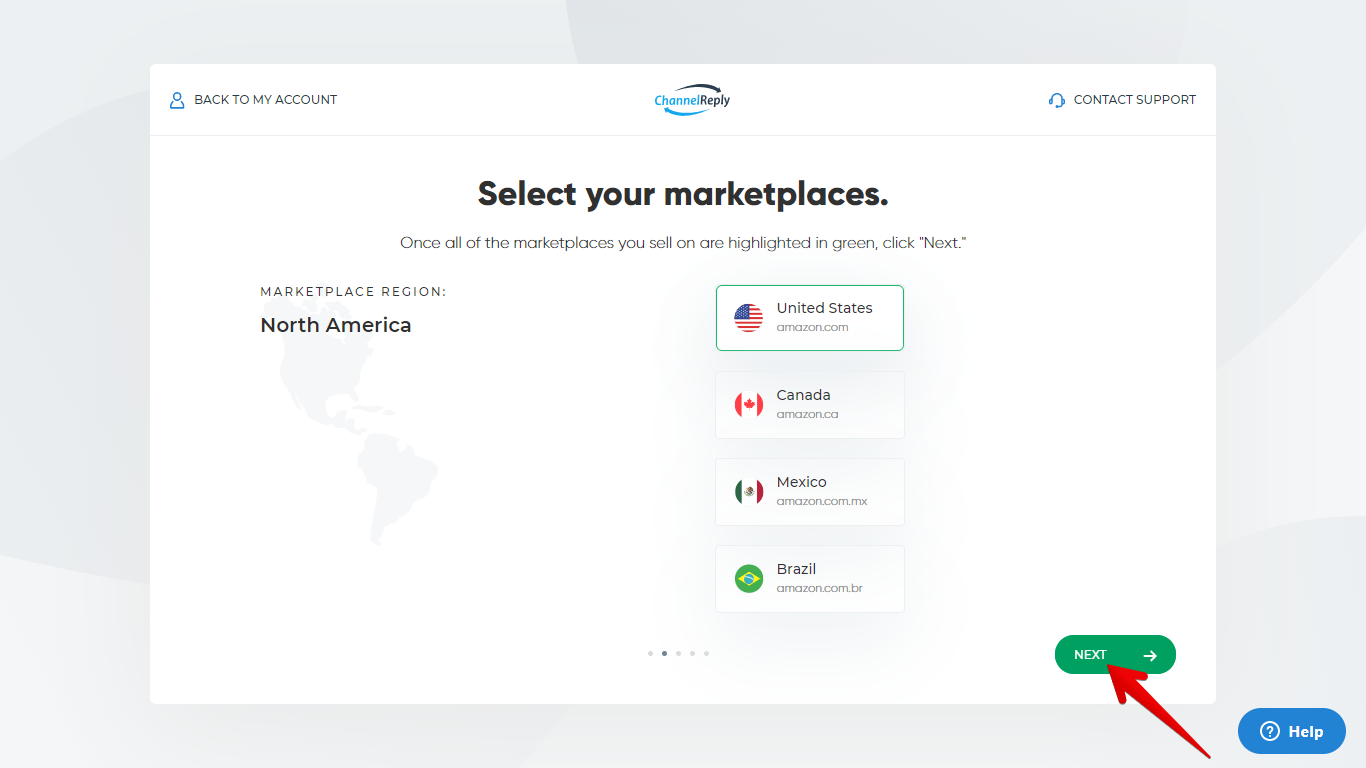
On the next screen, click on each of the marketplaces where you sell. Each marketplace will be highlighted in green after you select it. The account we're connecting only sells on Amazon’s US marketplace, so we’ve only selected Amazon.com below.
Once all your marketplaces are highlighted, click “NEXT.”
3. Give Us Permission to Access Your Account as a Developer
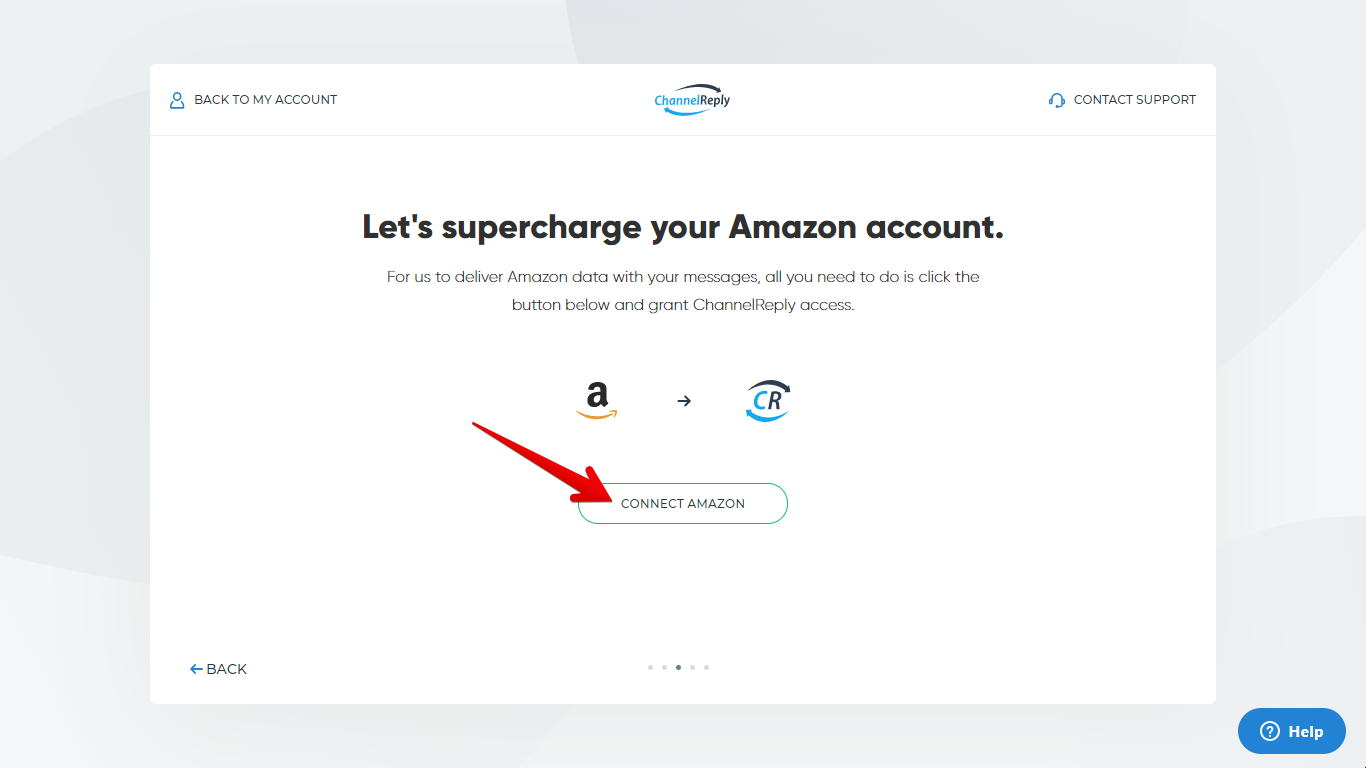
Click on “CONNECT AMAZON.”
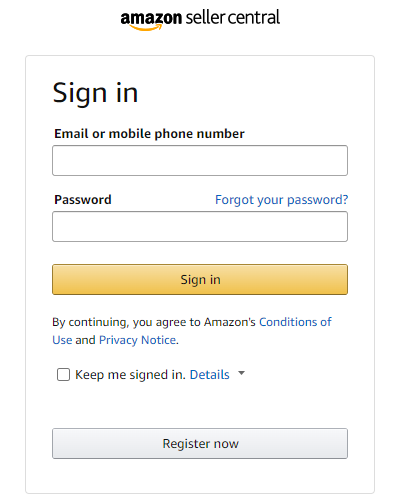
After clicking “CONNECT AMAZON,” sign in to your Amazon seller account as the account owner. Remember, you must sign in as the owner. Even admins do not have sufficient permissions.
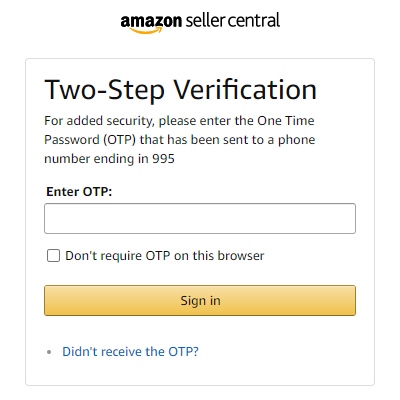
Note that you may need to complete two-factor authentication before you can proceed.
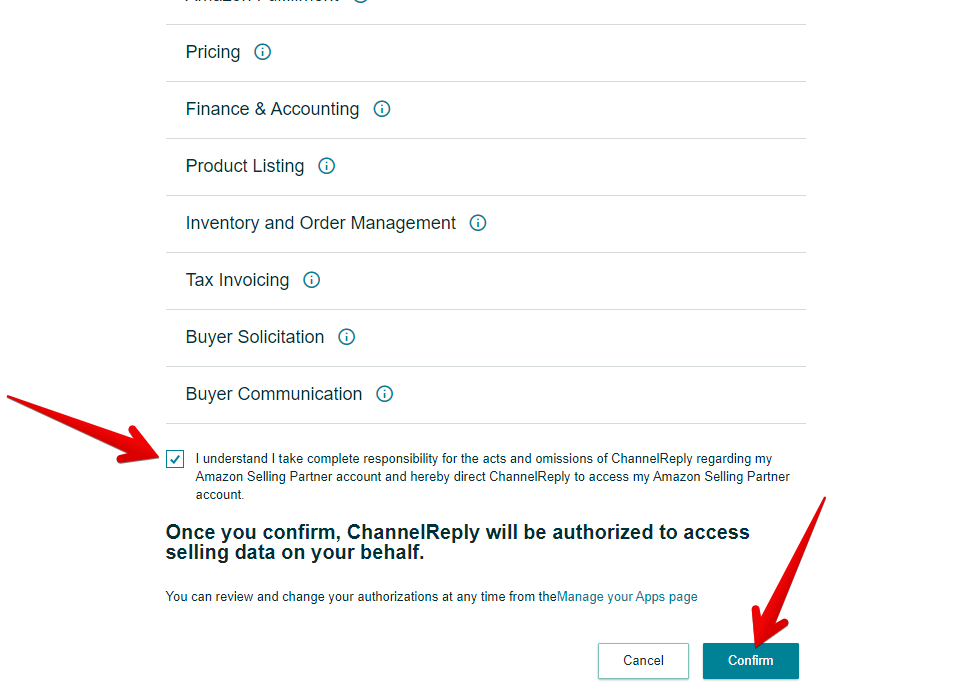
Once you have signed in, you will be shown an agreement in Seller Central authorizing ChannelReply to integrate with your account. To agree to the terms and continue setup, check the box and then click “Confirm.”
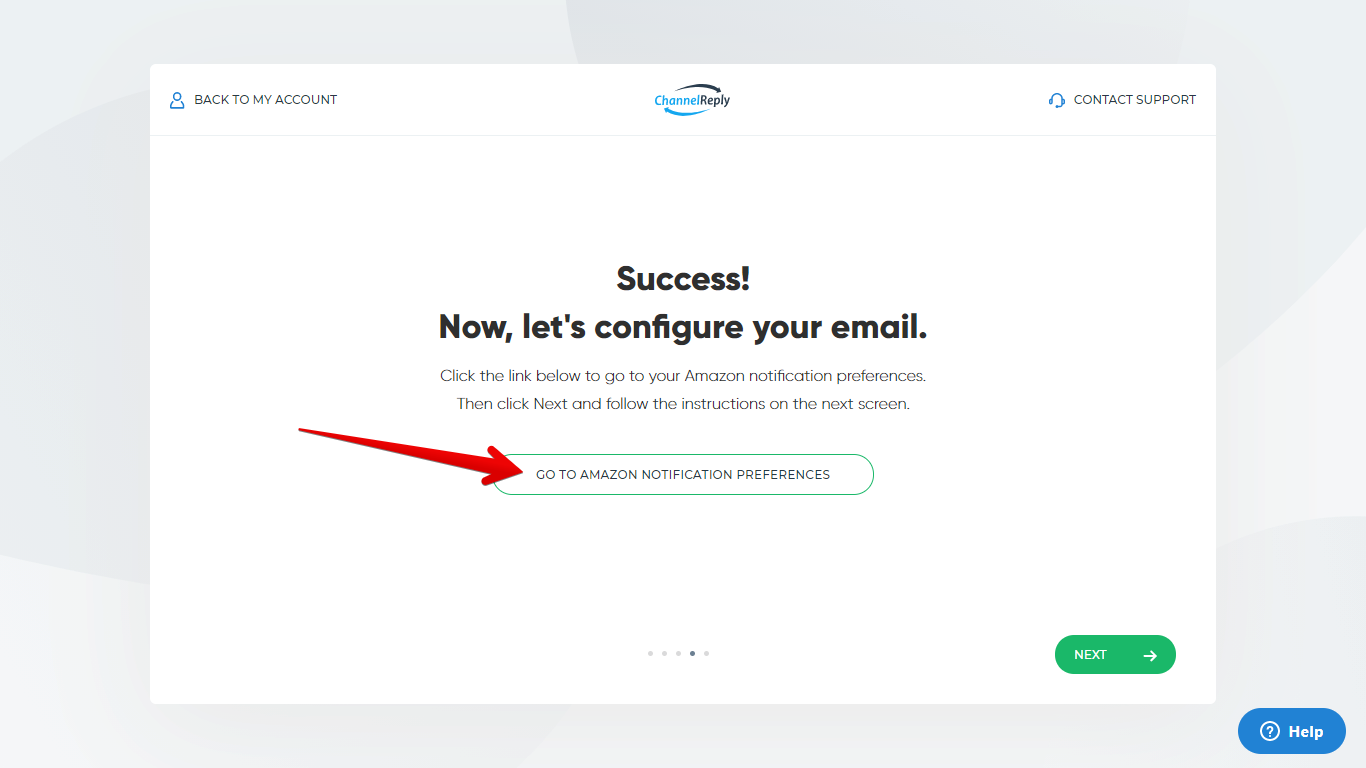
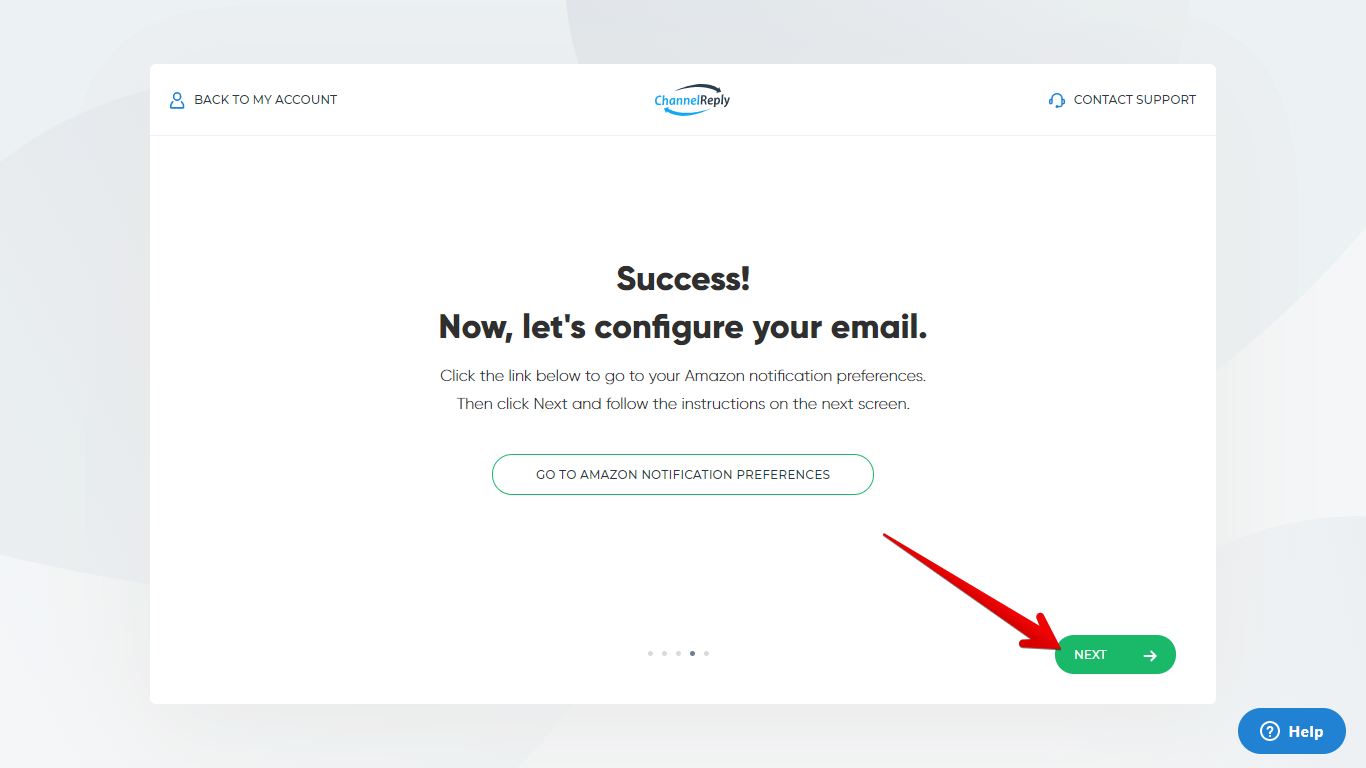
Leave the new tab open. Return to the ChannelReply tab and click “NEXT.”
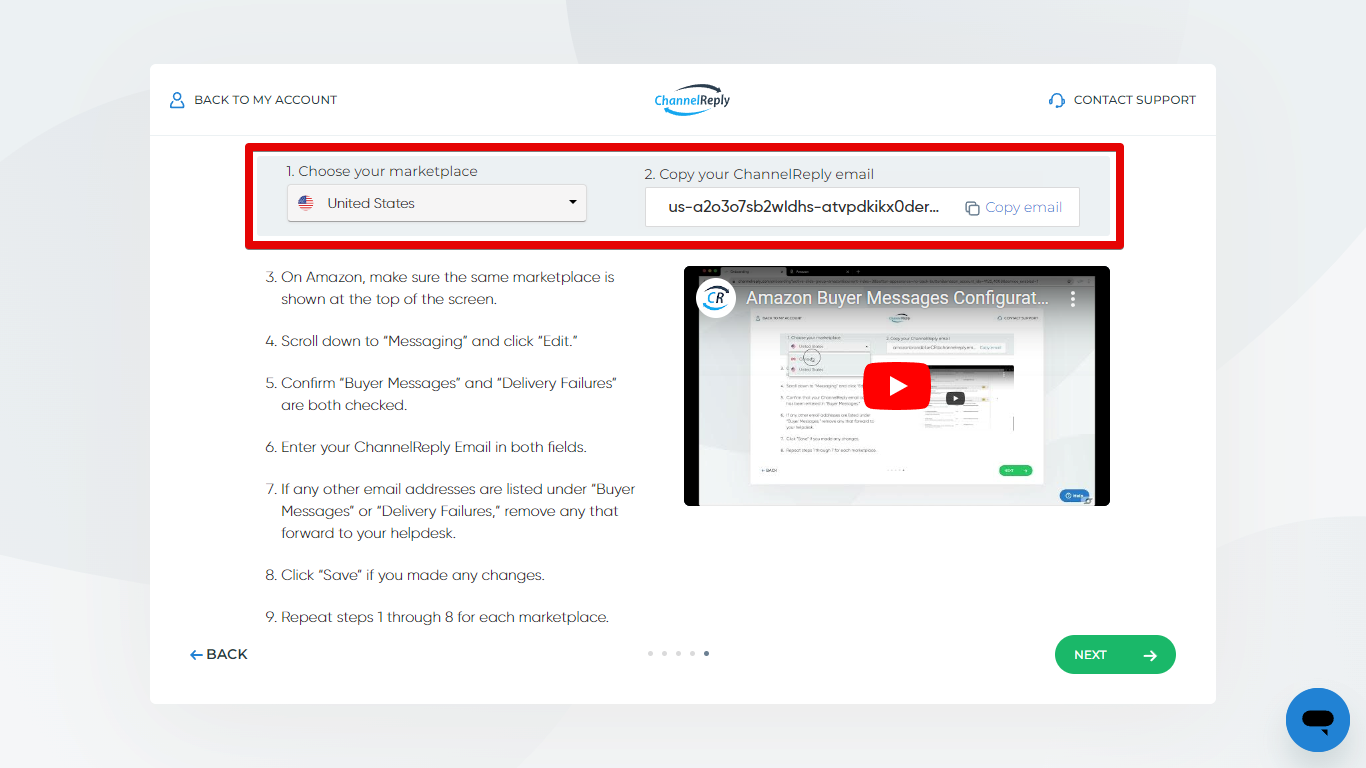
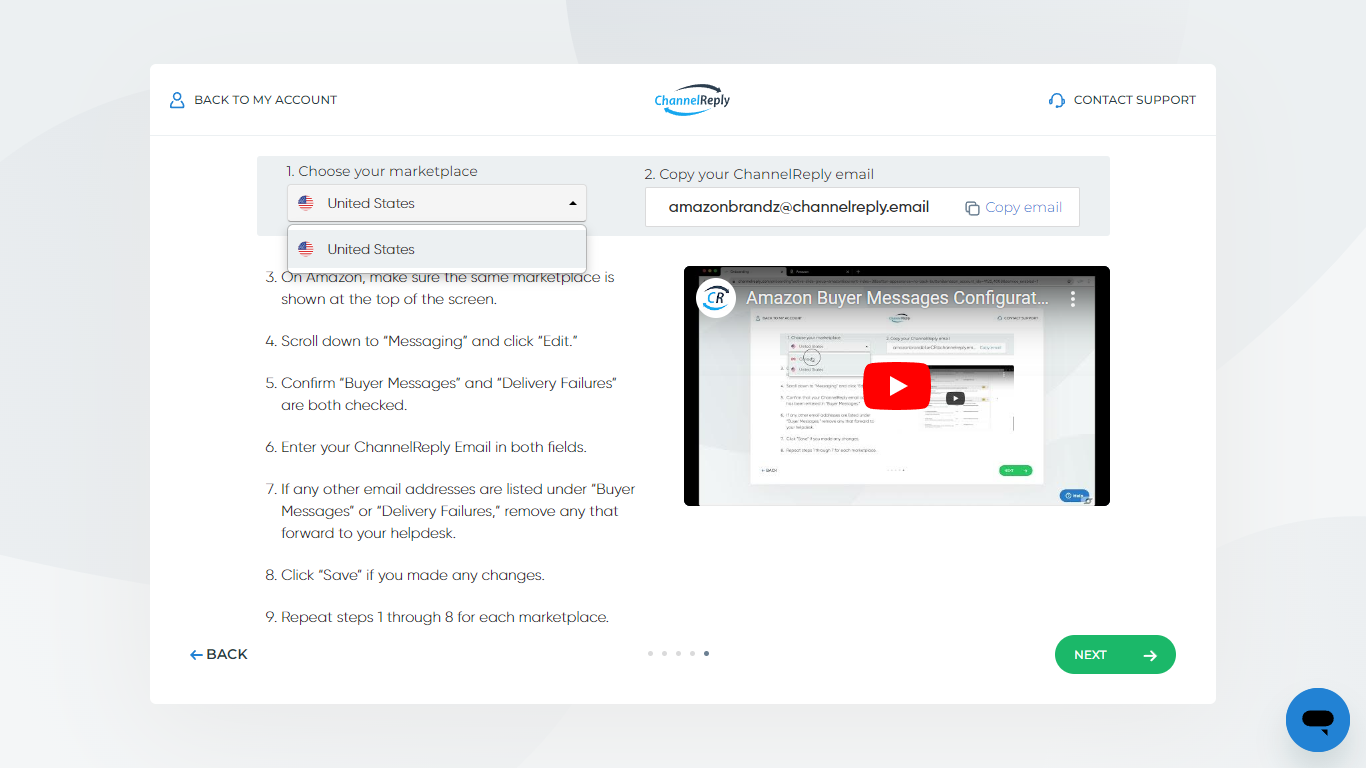
At the top of the screen, you will see two fields: a marketplace and a default ChannelReply email address.
The default address is built from the Amazon marketplace’s initials and ID, your Amazon seller ID, and our @channelreply.email domain.
Your customers will never see this email address, so it’s OK for it to be ugly! However, you can edit it now if desired. It just has to end in @channelreply.email and be unique—it can’t be an address that any of our other customers already uses.
Click anywhere outside the box to save your changes to your ChannelReply Email.
Each marketplace you connect should have a unique email address. You can change which marketplace's email you're editing by choosing a new marketplace in the dropdown menu on the left. Since we only chose the US, it’s our only option, but you may see several choices here.
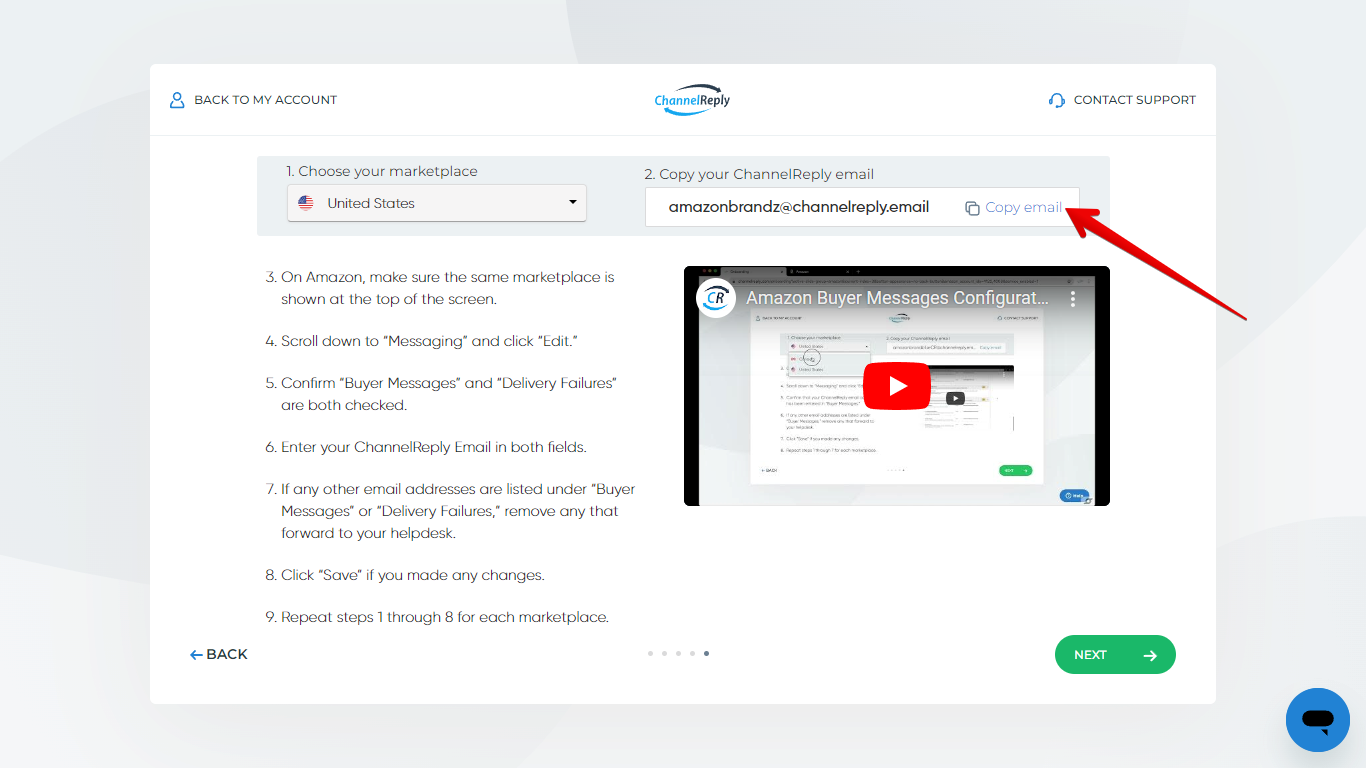
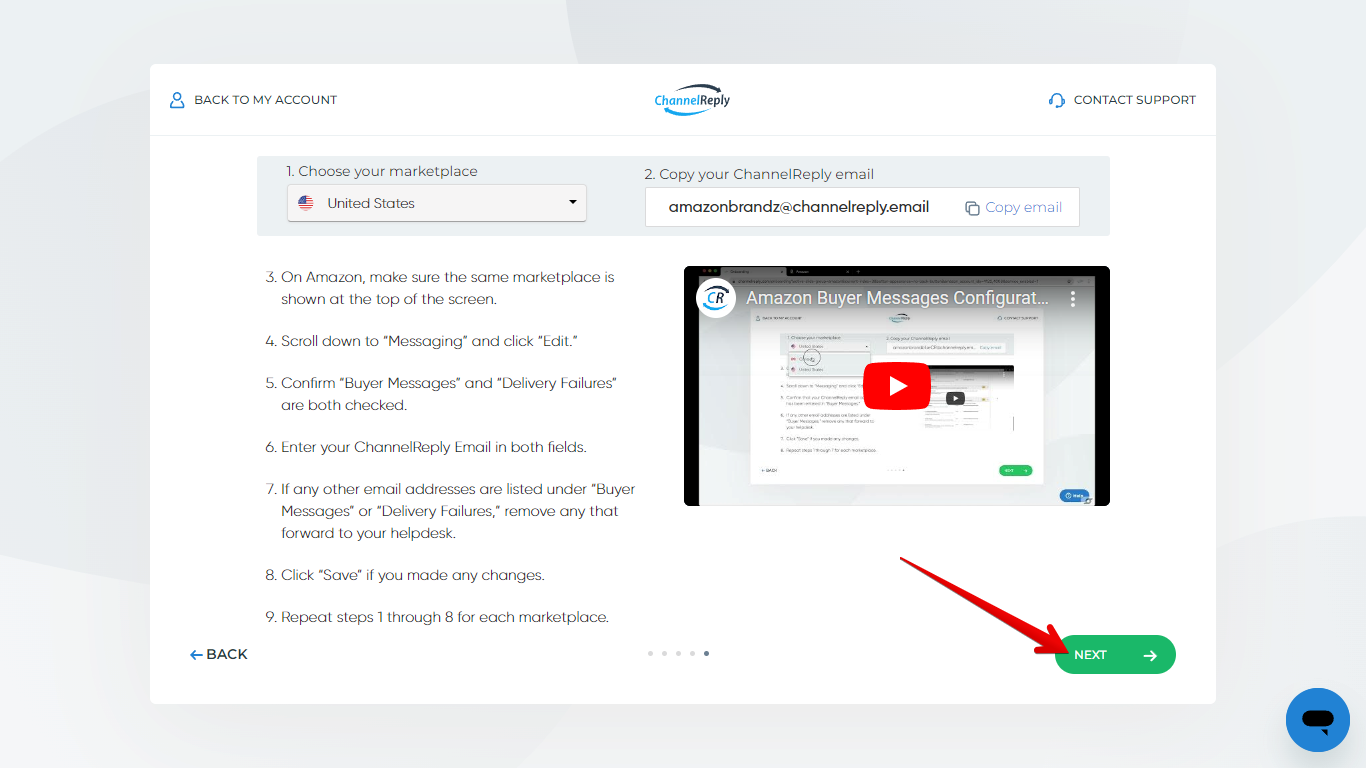
Once you are happy with your email addresses, select any marketplace from the dropdown. Then click “Copy email.”
Now switch to the Amazon Notification Preferences tab that you opened earlier.
Make sure the marketplace selected at the top of the screen matches the one shown in ChannelReply. For example, we chose Amazon US on our ChannelReply screen, so we've made sure we have United States selected as the current marketplace.

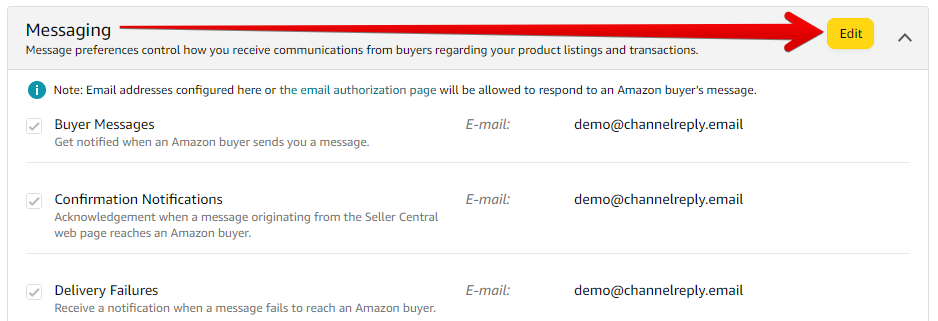
Next, scroll down to “Messaging.” Click the yellow “Edit” button to the right of “Messaging.”
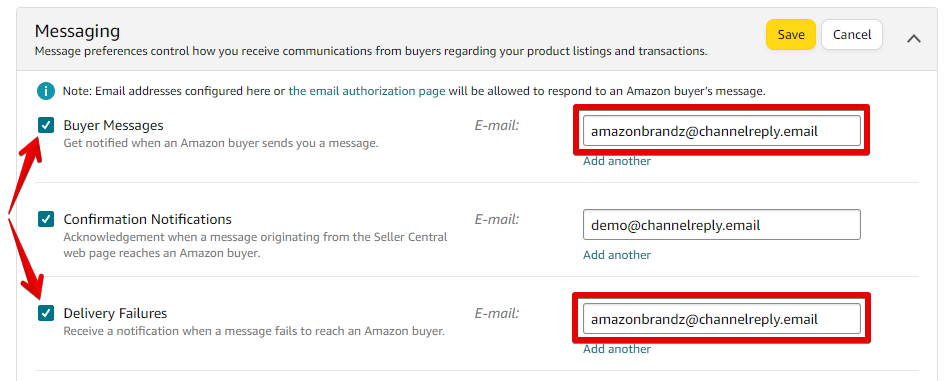
Find "Buyer Messages" and "Delivery Failures." Make sure both boxes are checked. Enter your ChannelReply Email in both E-mail fields.
You can use "Add another" to enter additional addresses for either field. Just do not add any other email addresses that forward to your helpdesk. Otherwise, you could end up with duplicate messages and other errors.
Remember to hit “Save” once finished!
Optional: Enable Notification Delivery
While you’re here, you can configure delivery of all your Amazon notifications. (You can skip to step 5 now if you only want your customer messages.)
You can choose to have ChannelReply deliver your one-way Amazon notifications. That way, if a notification is related to a specific order, you’ll see data about that order in the ChannelReply app. ChannelReply will also be able to populate any custom fields you have set up.
Just note that messages delivered through your ChannelReply Email count toward message limits. You can forward one-way notifications straight to your helpdesk to avoid this, though. See "How to Forward Amazon Notifications to Your Helpdesk" for instructions.
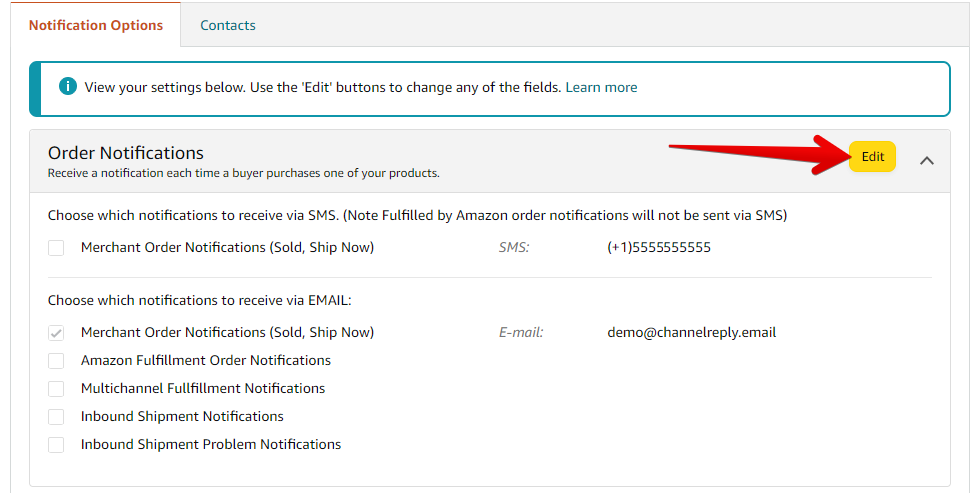
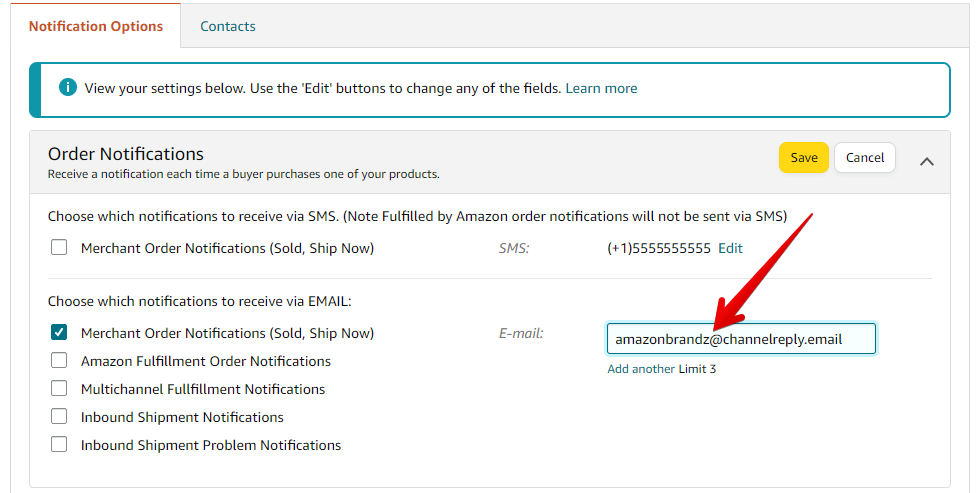
If you want ChannelReply to manage delivery for any kind of one-way notification, simply click the appropriate “Edit” button. Then replace the old email with your ChannelReply address.
You can return to this page any time you need to make changes. All you have to do is log in to Amazon Seller Central, then mouse over the gear icon in the upper right and select Notification Preferences.
5. Connect Other Marketplaces in the Same Region (If Any)
If you only selected one marketplace in step 2, you can jump to step 6 now.
If you selected multiple marketplaces, scroll to the top of the screen in Seller Central. Mouse over the current seller name and marketplace:
Choose one of the other marketplaces you wish to connect.
Now, return to ChannelReply. Choose the same marketplace you just selected on Amazon.
step 4 to configure your email settings for the new marketplace.
Repeat this step (step 5) for each marketplace you selected during step 2.
6. Finalize Your Integrations
Make sure you have finished configuring Notification Preferences for all your Amazon marketplaces. Then return to ChannelReply and click “NEXT.”
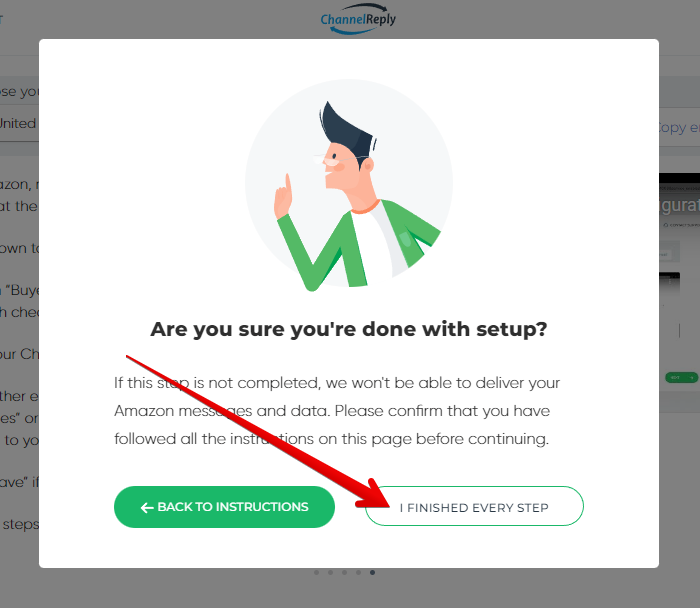
You'll see a popover asking if you're sure you've followed all the instructions on this page. If you are, click "I FINISHED EVERY STEP."
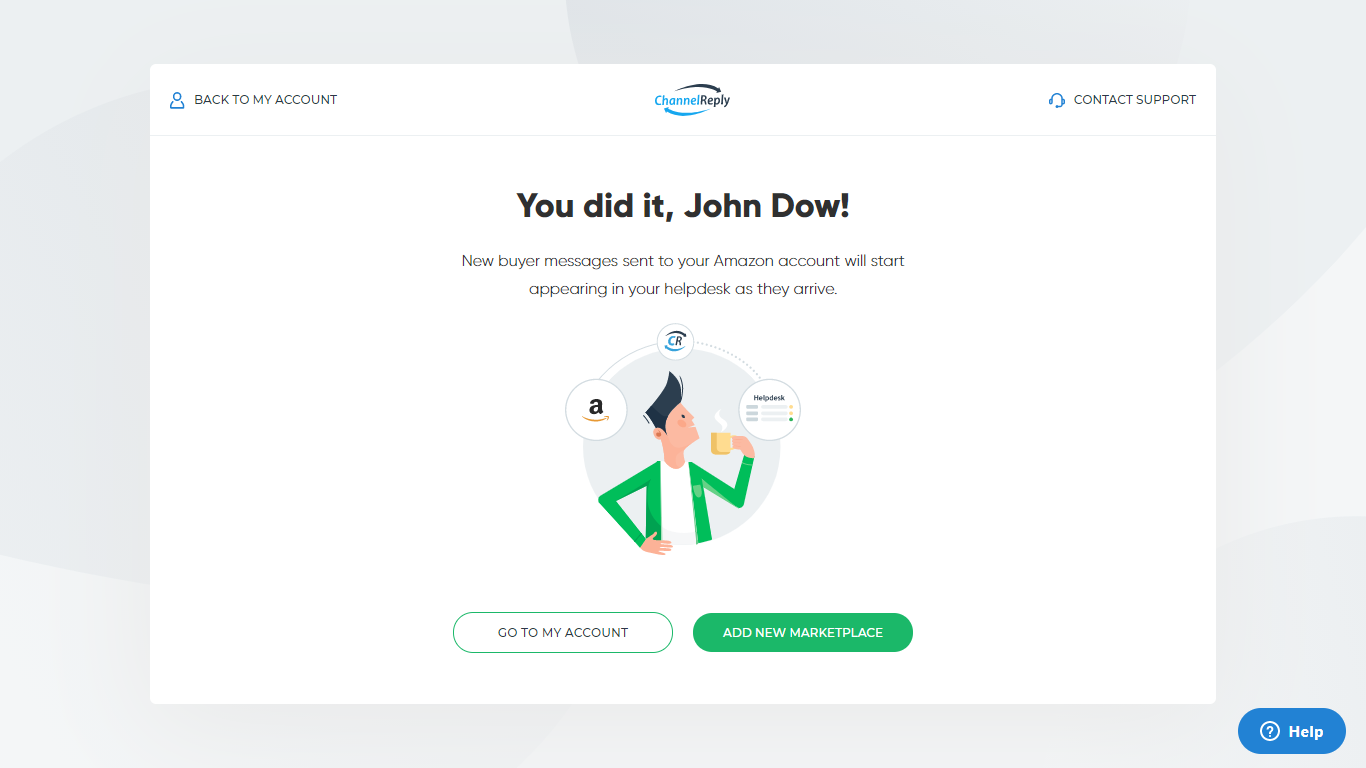
You’ll arrive on our setup success screen:
Congratulations! You have now integrated this Amazon account with ChannelReply. All your settings are saved and messaging is active. You can safely leave now and come back later.
7. Configure Advanced Settings (Optional)
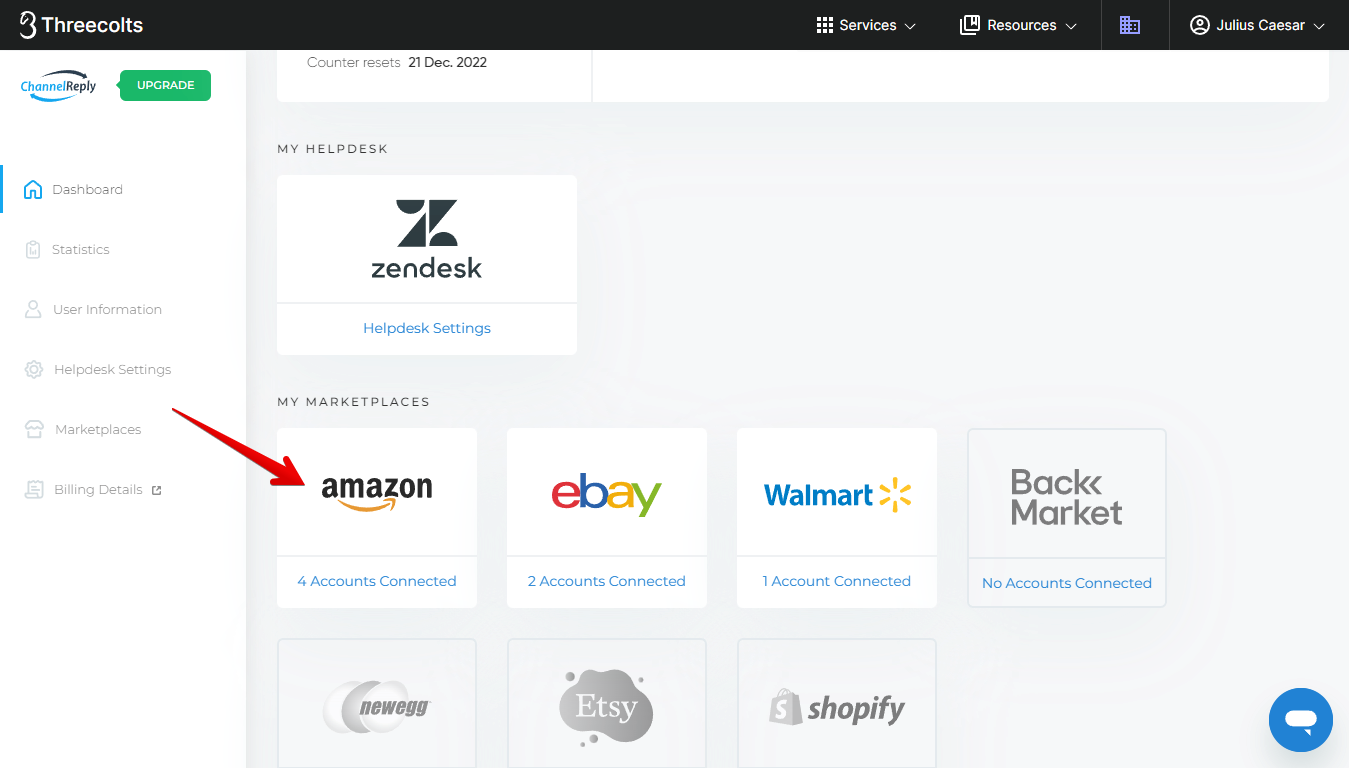
Choose Amazon on your ChannelReply dashboard.
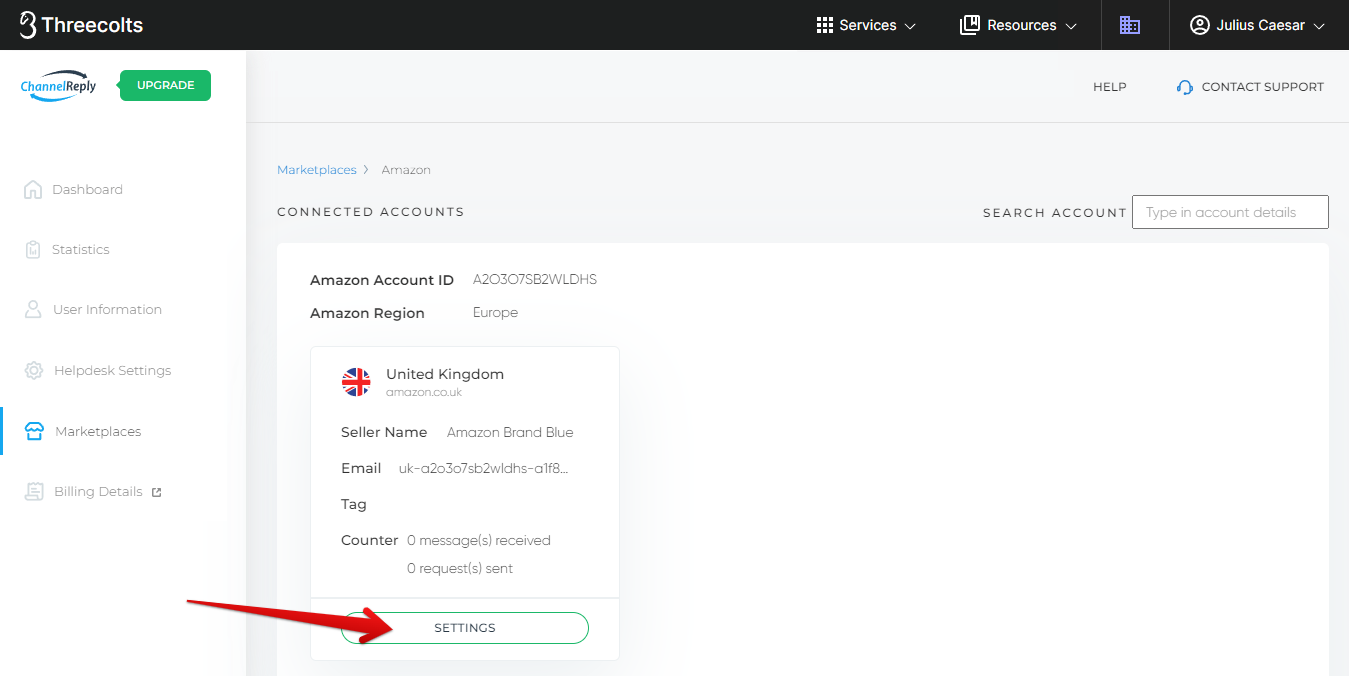
You will now see all your connected accounts. Click “SETTINGS” under any account you would like to manage.
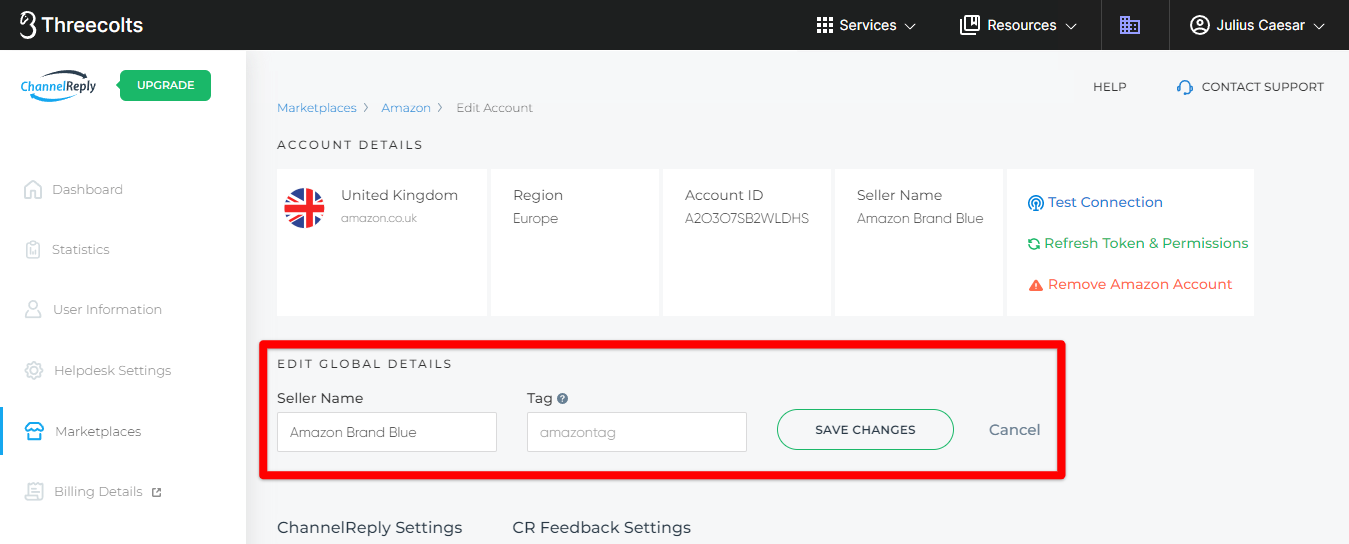
You will then see all your advanced options.
Edit Global Details
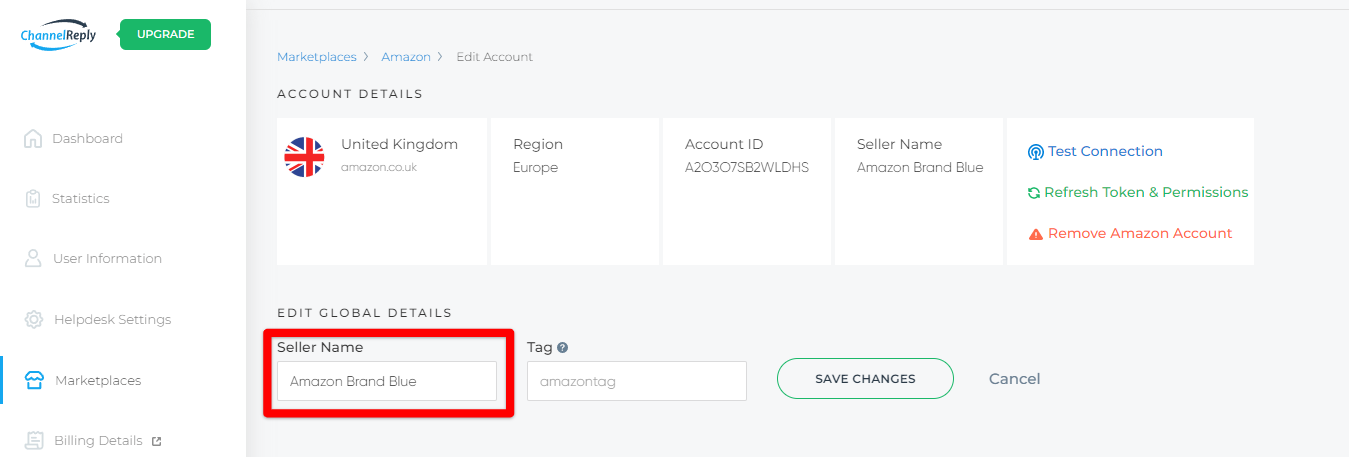
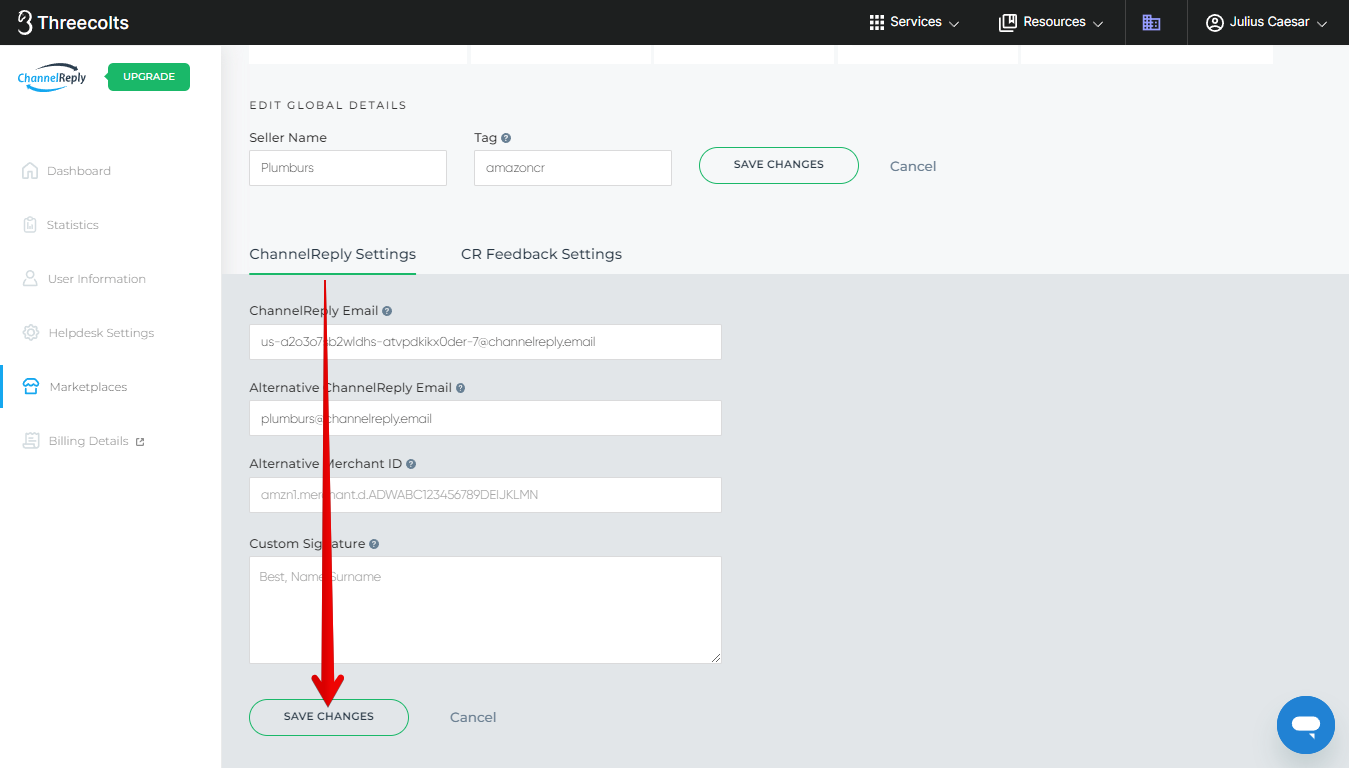
The "EDIT GLOBAL DETAILS" section contains all settings that apply to both ChannelReply and CR Feedback: the seller name and the tag. If you enter or change your seller name / tag, be sure to click the "SAVE CHANGES" button inside the Global Details section.
Seller Name
The first setting you can edit is your seller name (the name of your brand as it appears on Amazon). The seller name field has no impact on what customers see or what Amazon sees. It's simply here to help you keep track of which account is which if you have more than one.
We will populate this field automatically if possible, but it can take time. You can enter your seller name manually if needed.
Tag
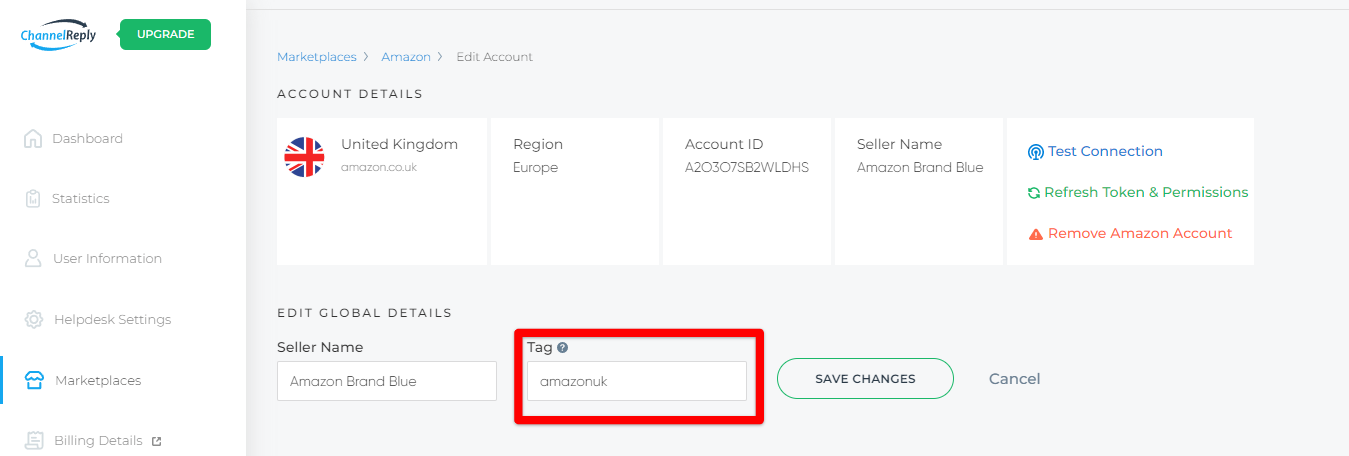
Tags are strongly recommended for all ChannelReply users. They identify which marketplace and account each message comes from. They are also critical for almost all advanced support tools.
Create a unique tag for this particular marketplace. We’ll use “amazonuk” for this Amazon UK account.
Note that if you use spaces in your tag, each word will become a separate tag in your helpdesk. Use underscores or dashes (e.g. amazon_uk or amazon-us) if you want to visually separate multiple words.
To learn more about tags and how you can use them, see our guide to ChannelReply tags.
Remember to save your changes!
ChannelReply Settings
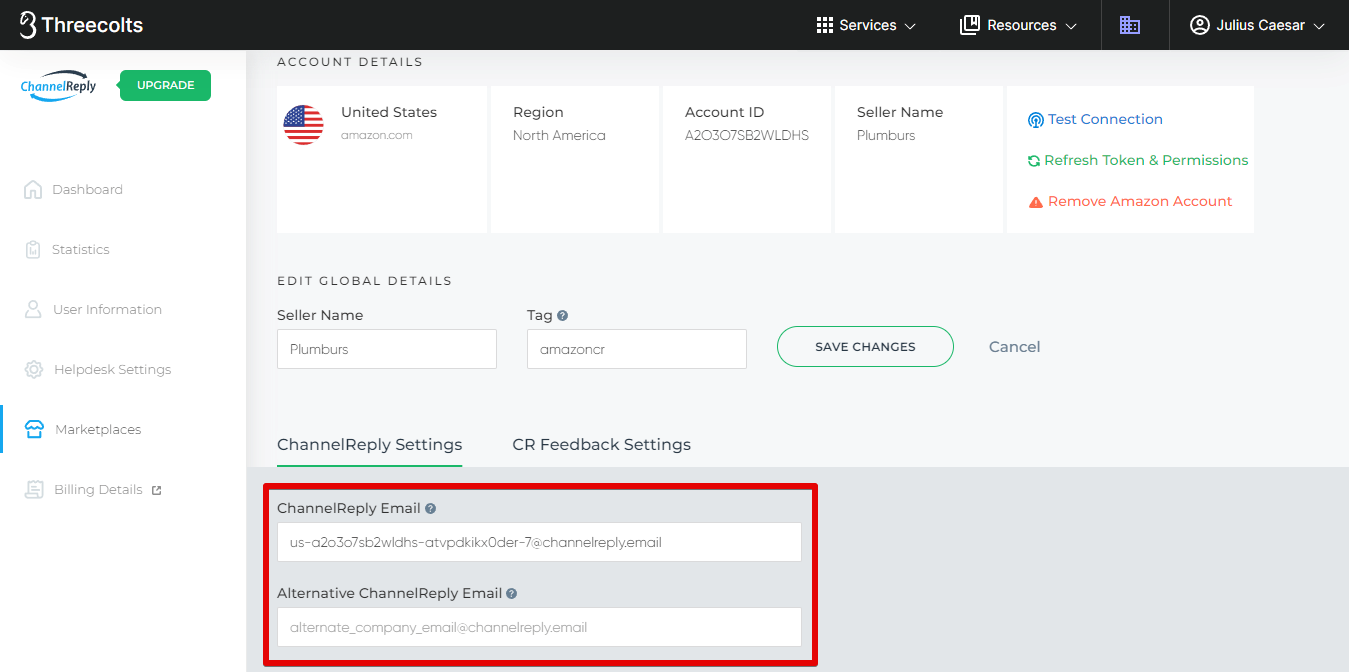
ChannelReply Email & Alternative ChannelReply Email

If you change your ChannelReply Email, you will need to repeat step 4 for this marketplace.
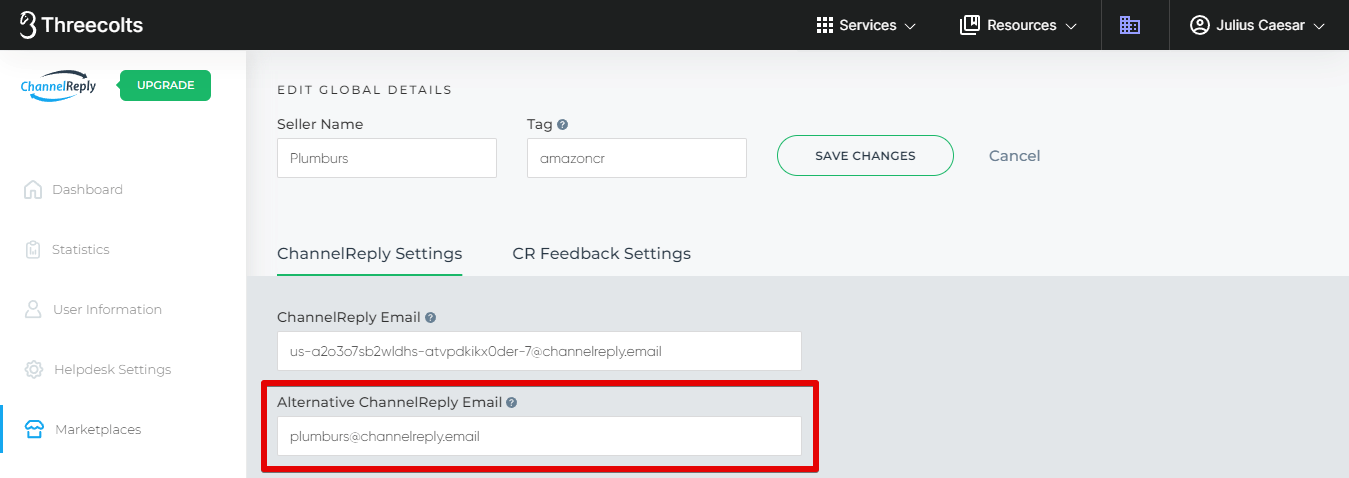
You can change your ChannelReply Email at any time. However, if you change your ChannelReply Email, messaging will stop until you save your new email in Seller Central. That's why we've provided the Alternative ChannelReply Email field.
When you have an Alternative ChannelReply Email, both your old address and the alternative can deliver your messages. You can therefore change the email address in Seller Central without interrupting messaging.
Note that any new address must not be in use by any other ChannelReply user, and it must end in @channelreply.email. You will not be able to save changes if either email is invalid.
If you create or change an email address, be sure to click "SAVE CHANGES" inside the ChannelReply Settings section. You must save your changes before you enter your new email address in Seller Central. It doesn't exist and won't work until it has been successfully saved.
Once your Alternative ChannelReply Email is saved, repeat Step 4 to enter it in Seller Central. Your messaging will not be interrupted.
Alternative Merchant ID
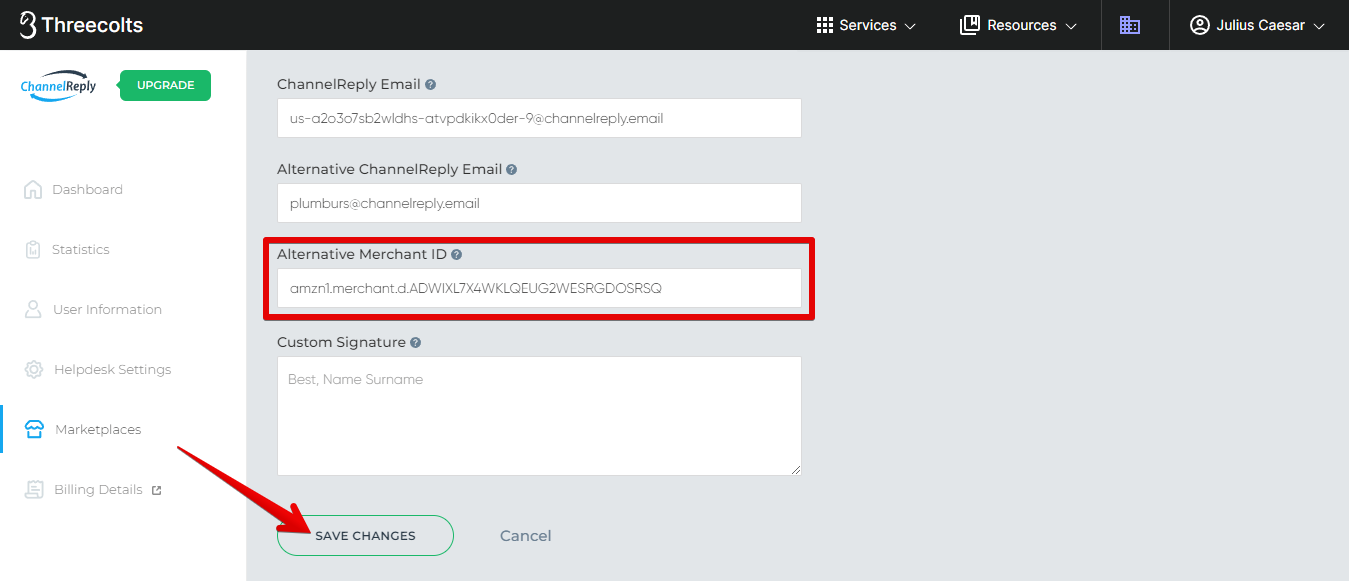
Entering your alternative merchant ID (MCID) helps our app provide better, more direct links to your Amazon orders.
To find your alternative merchant ID, log in to your Amazon Seller Central account. Be careful to log in as the same account you're editing in ChannelReply.
Next, mouse over the current account and marketplace at the top of the screen. Click on the country you're working on in ChannelReply, even if the correct one is already selected.
This will change the URL in Seller Central. Copy the new URL.
Paste it into the Alternative Merchant ID field in ChannelReply. We'll remove everything except the MCID. Finally, click "SAVE CHANGES" below the Custom Signature section.
You'll now receive better order links on all future messages from this Amazon marketplace!
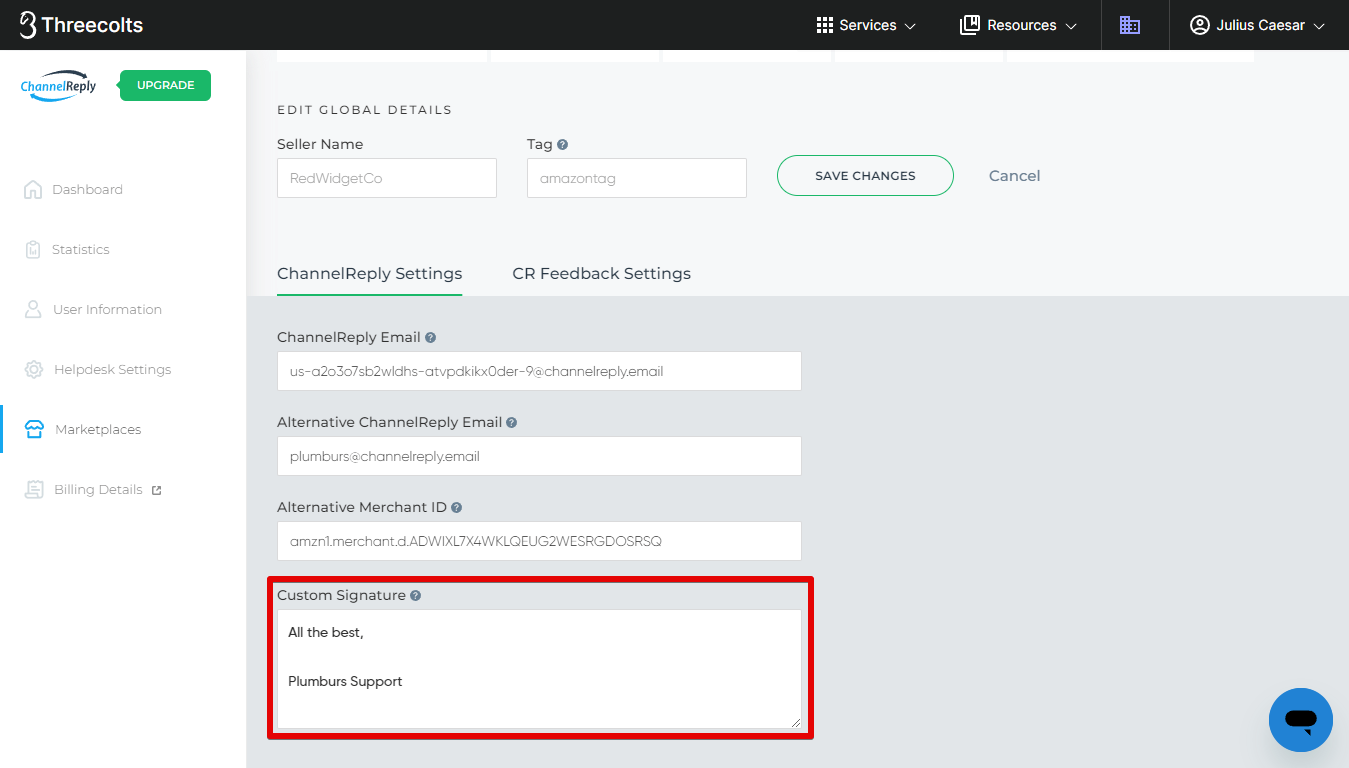
Custom Signature
You can enter a custom signature that will appear at the end of every reply you send. Note that this will appear in addition to the signature in your helpdesk, if you have one.
Be careful to avoid including any links that would violate Amazon policy in any signature. That goes for any signature in your helpdesk and any you create in ChannelReply. (However, note that you can use our text remover to get rid of links and unwanted text from your helpdesk signature.)
Notification Preferences
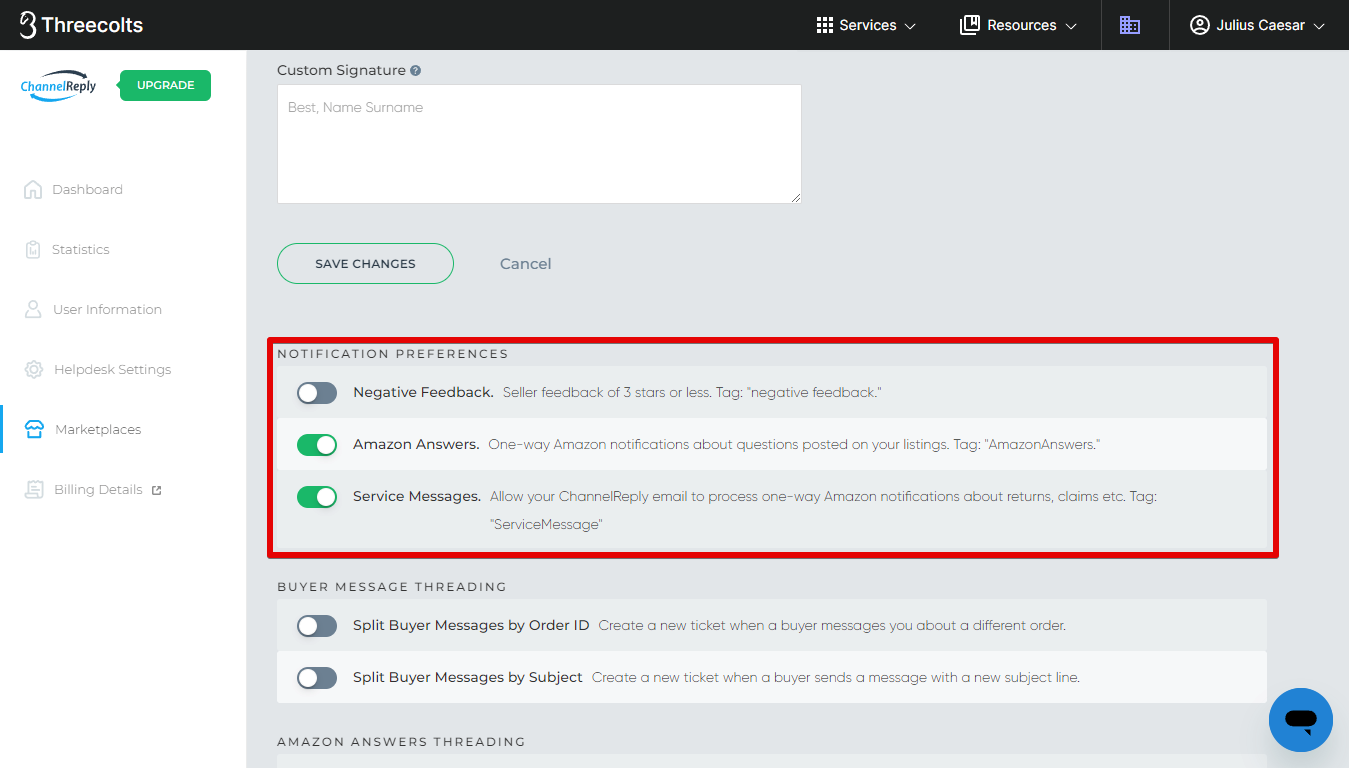
You’ll find a set of sliders near the bottom of the page. These give you additional control over your Amazon messages, especially your one-way notifications.
Negative Feedback: Move this slider to the right (green) to receive Negative Feedback notifications for this Amazon account. We will then notify you every time you receive a 1-, 2- or 3-star seller rating on Amazon. Please be aware that if enabled, these notifications will count toward your monthly message limit.
All Negative Feedback notifications have the tags "negative" and "feedback."
Amazon Answers: Move this slider to the left (grey) to disable Amazon Answers notifications. ChannelReply delivers these by default, but you can't reply to them from inside your helpdesk, and they count toward your message limit. So, some users prefer to turn them off to keep their message count low.
All Amazon Answers notifications delivered by ChannelReply have the tag "AmazonAnswers."
Service Messages: Turning this off will stop ChannelReply from delivering any other one-way Amazon notifications. In other words, your ChannelReply Email will only work in the Buyer Messages field in Seller Central. We only recommend turning this off if you absolutely do not want us to deliver any of your Amazon system notifications.
All service messages delivered by ChannelReply have the tag "ServiceMessage."
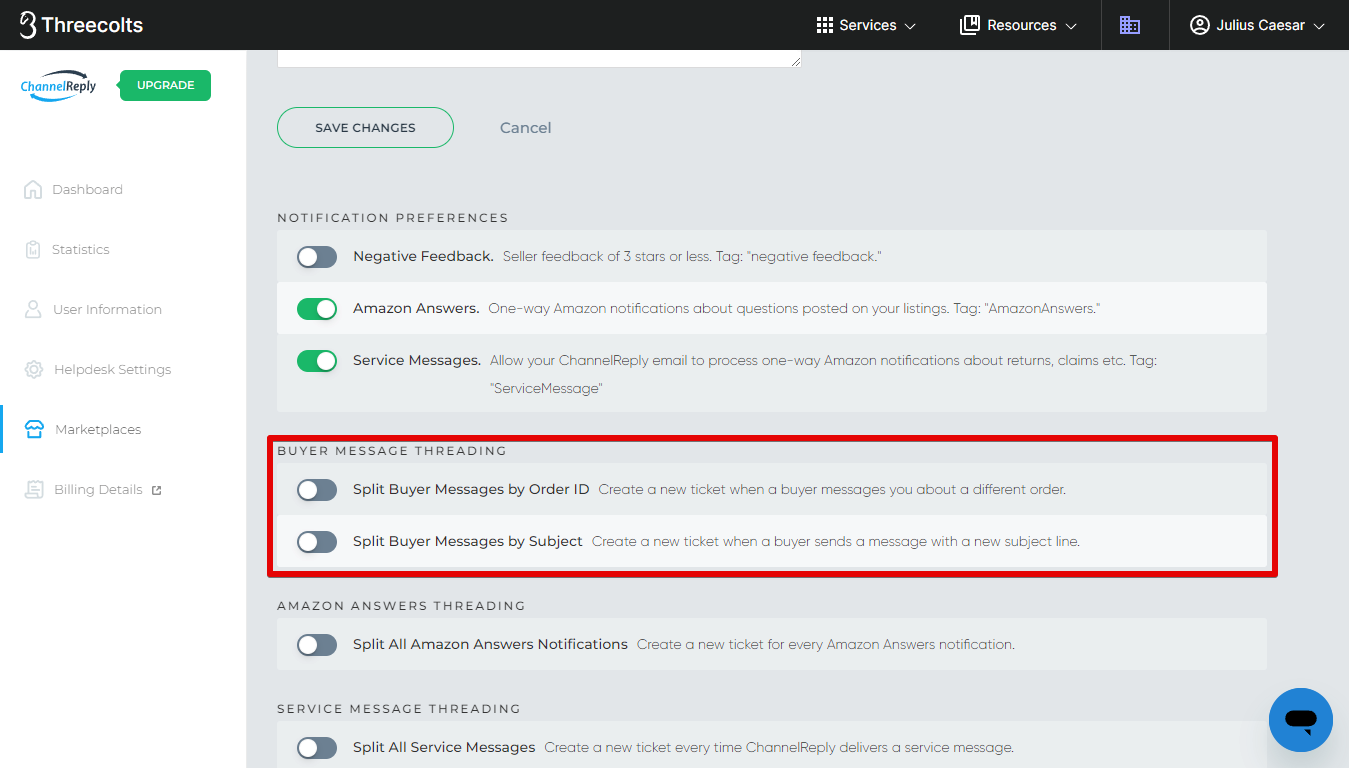
Buyer Message Threading
Normally, all Amazon messages sent by one user will thread into one ticket. You can change that by using the "Split Buyer Messages" settings here.
Split Buyer Messages by Order ID: Enabling this will create a new ticket each time an Amazon buyer messages you about a different order. This is a good way to make sure the ChannelReply app always displays data for the specific order the buyer has contacted you about.
Split Buyer Messages by Subject: When this is enabled, ChannelReply will create a new ticket every time the subject line of the buyer's email changes. You will often see multiple tickets about a single order.
Use these settings wisely. If both are turned on, a new ticket will be created when either condition is met. That means you may end up with a lot of different tickets for one customer!
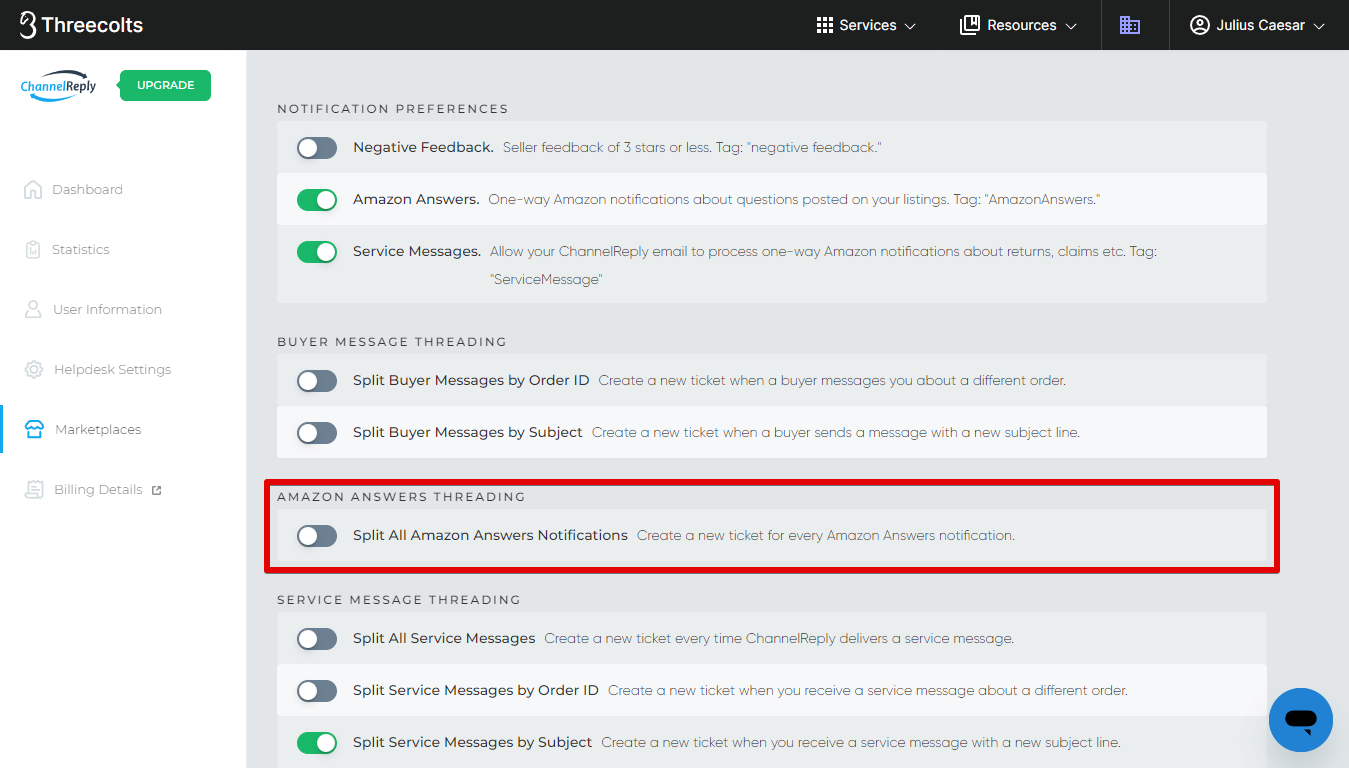
Amazon Answers Threading
Split All Amazon Answers Notifications: Normally, all Amazon Answers notifications go to one ticket, since they're always sent from the same Amazon email address. Enabling this option will make sure each Amazon Answers notification creates a new ticket instead.
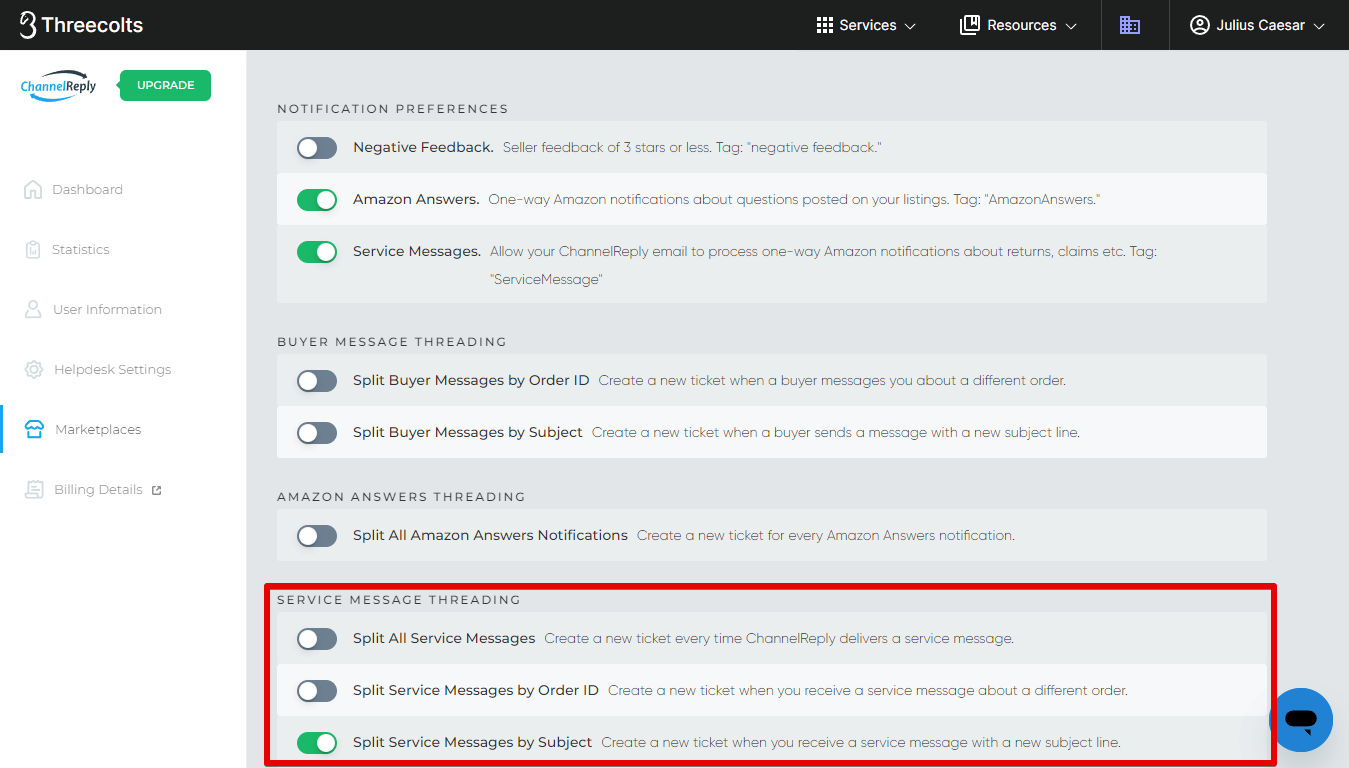
Service Message Threading
Did you choose to use your ChannelReply Email to deliver system notifications during step 4? If not, you can ignore these settings. If yes, you might want to try them out.
Service Message Threading settings don't affect buyer messages or Amazon Answers notifications. However, they change threading for all other Amazon notifications delivered by ChannelReply.
Split All Service Messages: Enabling this will cause every service message to create a new ticket.
Split Service Messages by Order ID: Not all Amazon system notifications are related to an order ID, so this option won't always have an effect. However, it will affect things like new order, A-to-z Guarantee claim, and return notifications. These can all be separated into multiple tickets based on the relevant order ID.
Split Service Messages by Subject: When this is enabled, every system notification with a unique subject line will create a new ticket.
8. Adding More Countries, Regions or Accounts (Optional)
You can add as many other Amazon marketplaces and accounts as you want!
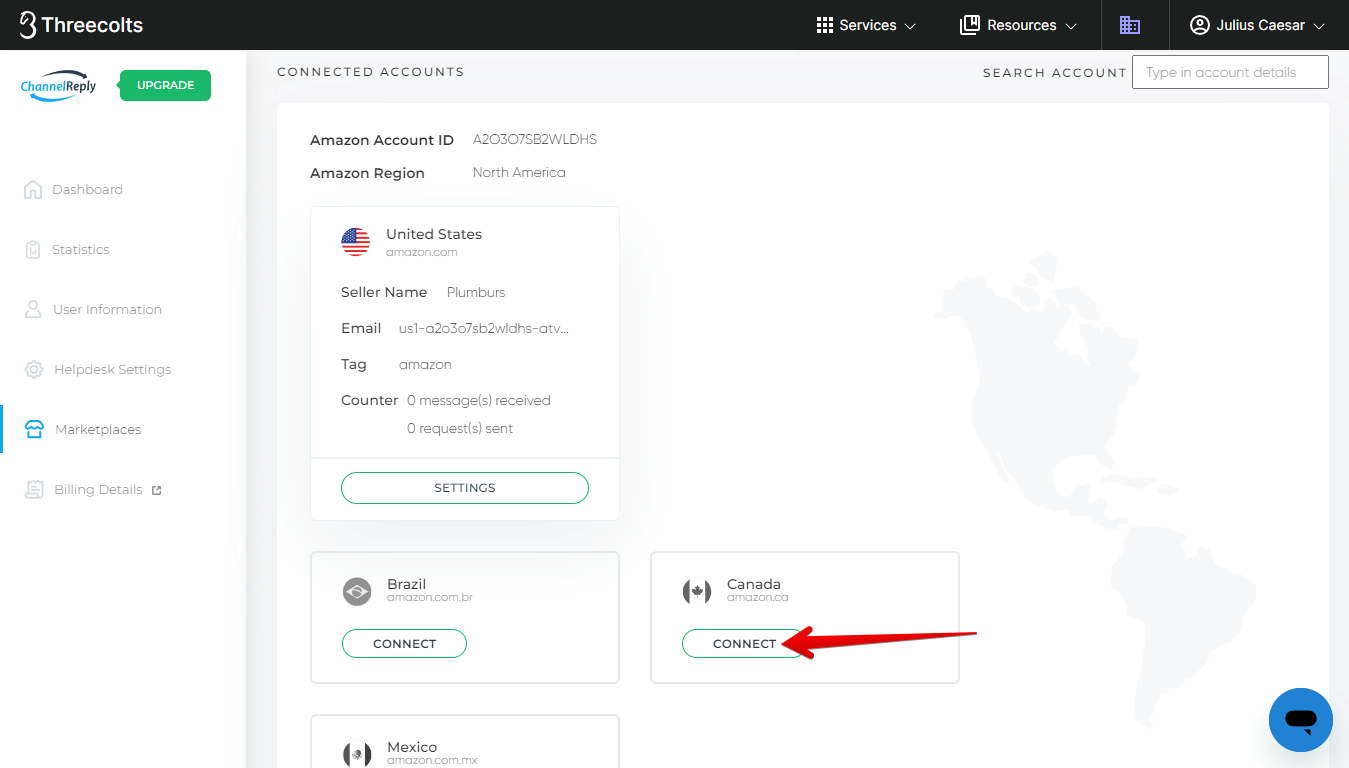
Adding a Marketplace for a Connected Amazon Account
Adding more marketplaces (countries) to an account/region you’ve already connected is super easy. Go to your ChannelReply dashboard and click “Amazon.”
Find the account/region you want to add a marketplace to. Click “CONNECT” on the marketplace you want to add.
Then, repeat the instructions from step 4 onward.
Note that you only need to configure Notification Preferences for the marketplace you just connected. You do not need to redo the email settings for the marketplaces you connected earlier.
Adding a New Amazon Account/Region
Adding other Amazon accounts/regions works the same way as adding the first. Simply jump back to step 1 and follow these instructions from the beginning.
If you have concerns about whether this might break Amazon’s rules, don’t worry! None of our customers have ever reported an issue with this. See “Can Amazon Tell if I Have Multiple Amazon Accounts on ChannelReply?” for details and information security options.
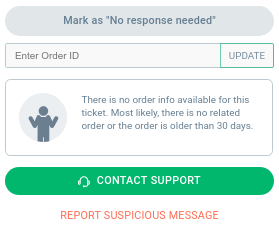
If no info is shown within Onsite, users can manually enter the message's order ID.
That lets you see all data on Amazon conversations that started before you set up ChannelReply.
If you have any questions at all, please feel free to reach out to us by sending an email at support@onsitesupport.io


